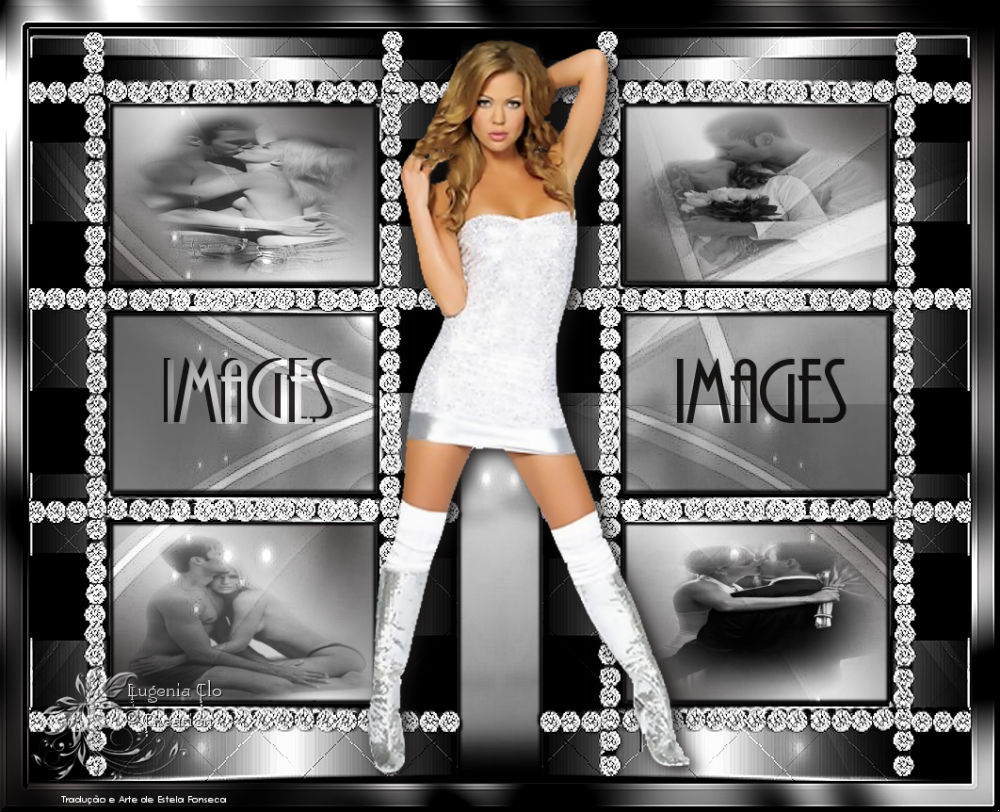
IMAGES
Tutorial criado por Clo 2016/25 -
Todos os direitos reservados. Traduzido com permissão da
autora.
Tutorial original...
AQUI.
Tutorial traduzido no PaintShopPro
2022 ULTIMATE.
Material Necessário:

Woman2724_byClo
1220724080_couplesT2009_angie068
Tube810_Couples_07_08_sdt
WeddingByKoleszaEdit-mist by dragonblu048
Frame_byClo
NarahMasks_1811
Testo_byClo
Sfond_byClo
marca d'água Clo ©Creation
Plugins:
Alien Skin Eye Candy 5 / Impact
Filters Unlimited 2.0 /&<Background
Designers IV>
Preparação:
Instale os filtros que você não tem na pasta
correspondente antes de abrir seu Psp.
Abra seus tubos no Psp, duplique-os e
feche os originais.
Não se esqueça de salvar regularmente.
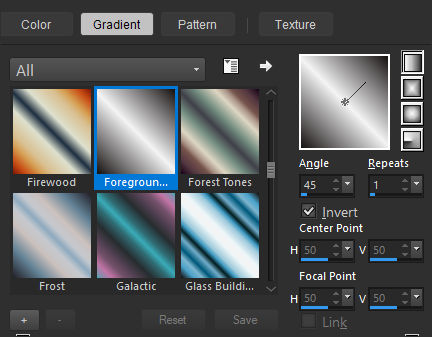
01- Paleta de Materiais
Primeiro Plano cor #f3f3f3
 / Plano de Fundo #171313

Forme no Primeiro Plano um Gradiente
Linear e configure como segue:
02- Abra a imagem “Sfondo_byClo” , duplique e
feche a original. Trabalhe na cópia.
03- Abra a imagem “Frame_byClo” Copie e cole como nova
layer.
Effects / image Effects / Offset: (-273 /
0 / Custom / Transparent)

04- Layers / Duplicate
Image / Mirror / Mirror Horizontal
Layers/ Merge / Merge Down
Effects / 3D Effects / Drop Shadow: 3 / 3
/ 100 / 3,00 / Cor #000000
Repita a sombra com os valores negativos:
-3 /-3
Adjust / Sharpness / Sharpen
05- Ative a Varinha Mágica e selecione o retângulo do
topo à esquerda.
Layers / New Raster Layer
Preencha a seleção com o Gradiente.
Adjust / Blur / Gaussian Blur / Radius 25
06- Layers / New Raster Layer
Abra a imagem “1220724080_couples”
Copie e cole na seleção
Selections / select none
Adjust / sharpness / sharpness
Opacidade / 85%
Layers / Merge / Merge Down
Layers / Arrange / Move Down
07- Ative a Layer do Topo
Ative a Varinha mágica e selecione
o retângulo de baixo do lado esquerdo.
Layers / new raster layer
Selections / modify / expande / 5 px
Preencha a seleção com o gradiente
Adjust / Blur / Gaussian blur:
Radius 25
08- Abra a imagem "T2009_angie068"
Layers / New Raster Layer
Cole na seleção
Selections / Select None
Blend Mode / Multiply
Opacidade / 80%
Layers / merge / merge Down
Layers / Arrange / Move Down
09- Ative a Layer do Topo
Ative a Varinha Mágica e selecione o
retângulo de baixo do lado direito.
Layers / New Raster Layer
Selections / Modify / Expande / 5 px
Preencha a seleção com o Gradiente
Adjust / Blur / Gaussian blur / Radius
25
10- Layers / New Raster Layer
Abra a imagem “WeddingByKoleszaEdit-mist
by dragonblu0408”
Copie e cole na seleção
Selections / Select None
Blend Mode / Luminance
Layers / merge / merge down
Layers / arrange / move down
11- Ative a layer do topo
Ative a varinha mágica e selecione o
retângulo do topo do lado direito
Layers / New Raster Layer
Selections / Modify / Expande / 5 px
Preencha a seleção com o Gradiente.
Adjust / Blur / Gaussian blur / Radius
25
12- Layers / New Raster Layer
Abra a imagem
“Tube810_Couple_07_08_sdt”
Copie e cole na seleção
Selections / Select None
Blend Mode / Hard Light
Layers/ merge / merge Down
Layers / Arrange / move down
13- Abra o tube do texto "text_byClo tube" Copie e cole
como nova layer
Pick (K) Postion X (143,00 ) Position Y
(346,00)
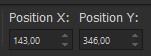 Tecla "M" para desativar a Pick.
14- Layers / New Raster Layer
Preencha com a cor branca (#ffffff)
Layers / new mask layer / from an image:
NarahMasks_1811
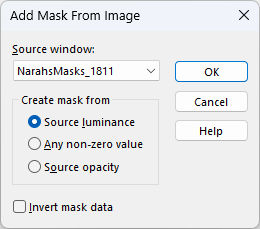
Layers / merge / merge group
15- Effects / Plugins / Filters Unlimited 2.0
/&<Background Designers IV> / sf10 Diamond Flip

Blend Mode / Overlay
Effects / Edge effects / Enhance
16- Abra a imagem “Woman2724_byClo”
Copie e cole como nova layer
Image / resize / 80% ... Resize all
Layers ... Desmarcado
Adjust / sharpness / sharpness
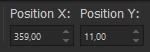
Pick (K) Postion X (359,00 ) Position Y
(11,00)
 Tecla "M" para desativar a Pick.
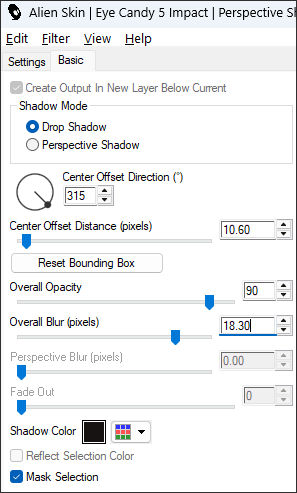
Effects / Plugins / Alien Skin Eye Candy
5 / Impact / Perspective Shadow:
17- Image / add border / Symmetric Marcado / 1 pixel cor
do segundo plano
Image / add border / Symmetric Marcado /
30 pixels cor #ffffff
Selecione esta borda com a Varinha
Mágica.
Preencha com o Gradiente.
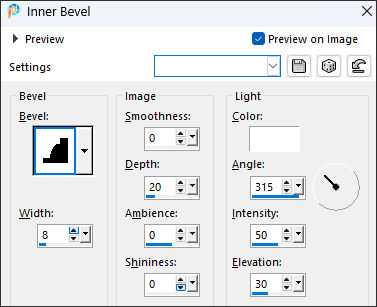
Effects / 3D Effects / Inner Bevel:
Adjust / sharpness / Sharpen More
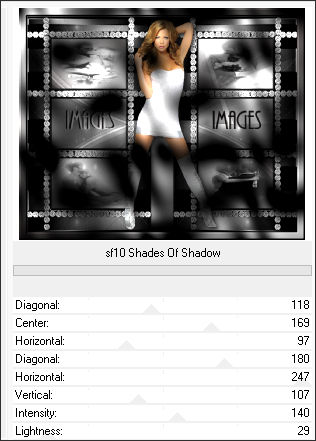
18- Effects / Plugins / Filters Unlimited 2.0 /
&<Background Designers IV> / sf10 Shades of Shadow
Adjust / sharpness / Sharpen More
Selections / select more
19- Adicione a sua assinatura
Adicione a marca d'água de Clo ©Creation’s
Layers / Merge / Merge all
Salve como Jpg.

Tutorial Traduzido por Estela Fonseca.
Não alterar nem repassar sem autorização. |