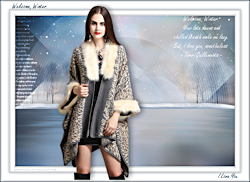
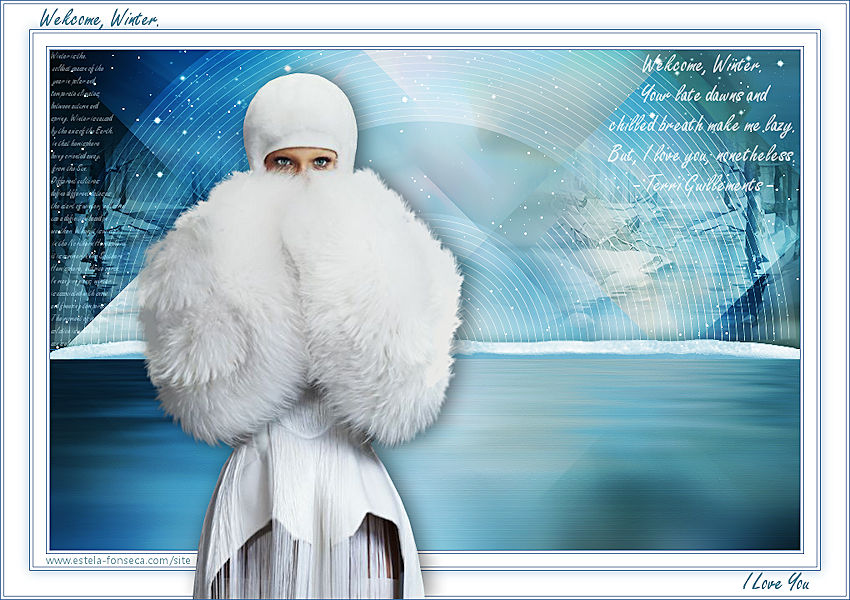
WELCOME WINTER
Tutorial de KaDs , original, Aqui.
Tutorial traduzido no PSP X9 mas pode ser feito em versões anteriores do PSP.
Materiais Necessários:
Tubes de KaD_WinterWoman20 / 423_KaD_WinterTrees / 423_KaD_Snow
Mask de Marge
Plugins Utilizados:Mehdi – Sorting Tiles
AP01 [Innovations] – Lines – Silverlining
MuRa’s Meister – Pole Transform
Flaming Pear – Flood
(*) Importados para o Unlimited 2.0
Preparação:
Abra os tubes no PSP, duplique e feche os originais.
Copie as seleções para a pasta de seleções do PSP
Abra a Mask no PSP e Minimize
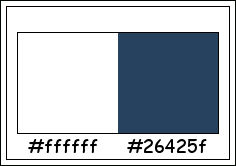
Tabela de Cores:
Primeiro Plano cor #ffffff / Segundo Plano cor #26425f
01- Abra <<423_KaD_Alfakanaal>>
Window / Duplicate (Feche o original)
02- Selections / Select All
Abra <<423_KaD_Achtergrond>> Copie e Cole na seleção
Selections / Select None
Nota: Colorize se estiver usando tube com cores diferentes.
03- Layers / Duplicate
Effects / Plugin / Mehdi / Sorting Tiles
04- Layers / Duplicate
Image / Mirror / Mirror Horizontal
Image / Mirror / Mirror Vertical
Blend Mode / Multiply
Opacidade / 40%
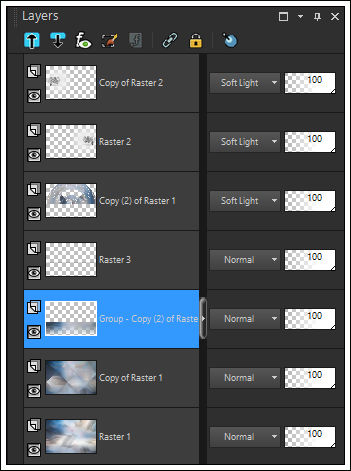
Layers / Merge / Merge Down
05- Layers / Duplicate
Image / Resize / 75%... Resize All Layers ... Desmarcado
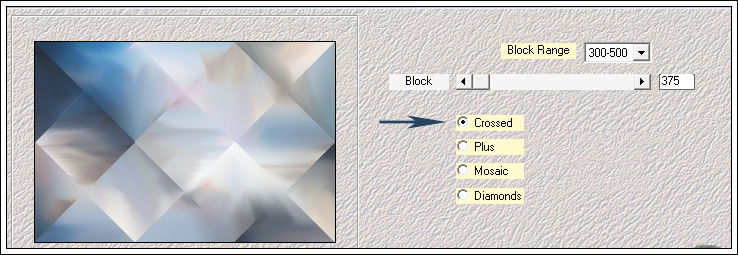
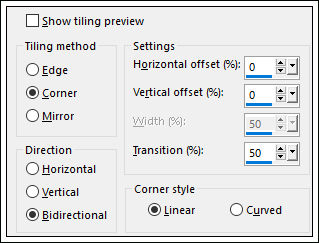
06- Effects / Image Effects / Seamless Tiling
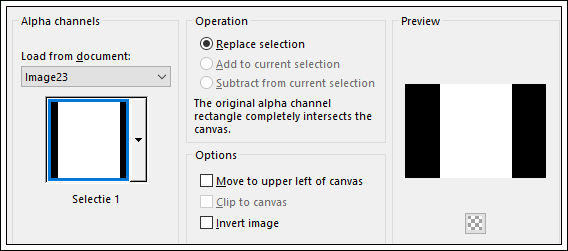
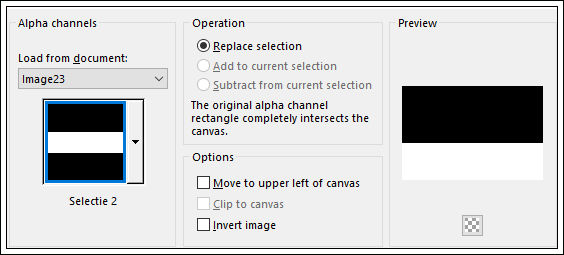
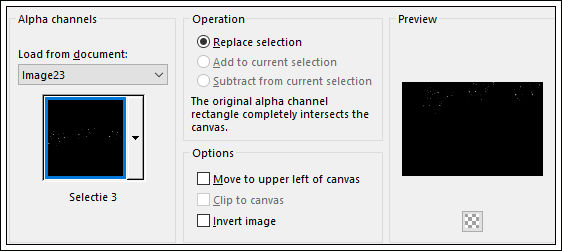
07- Selections / Load Save Selection / Load Selection From Alpha Channel: Selection #1
Edit / Cut ... Ou delete no teclado08- Mantenha a Seleção!!!!!
Ative a Layer do Fundo
Selections / Select All
Ative a Layer do topo
Image / Crop to Selection
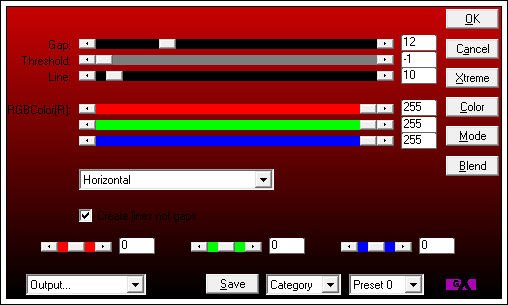
09- Effects / Plugin / AP 01 [Innovations] / Lines – Silverlining / Horizontal
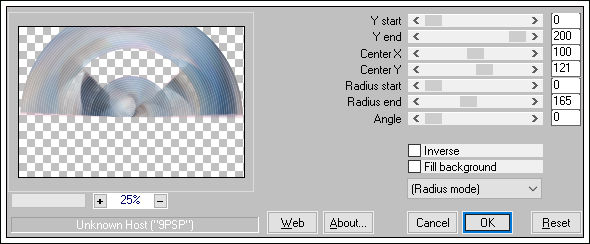
10- Effects / Plugin / MuRa’s Meister / Pole Transform
Blend Mode / Soft Light
11- Abra o tube <<423_KaD_WinterTrees>>
Copie e Cole Como Nova Layer
Image / Resize / 75%... Resize All Layers ... Desmarcado
Ferramenta Pick Tool (K) / Mode Escale / Posição de X e Y , conforme segue:
Blend Mode / Soft Light
12- Layers / Duplicate
Image / Mirror / Mirror Horizontal
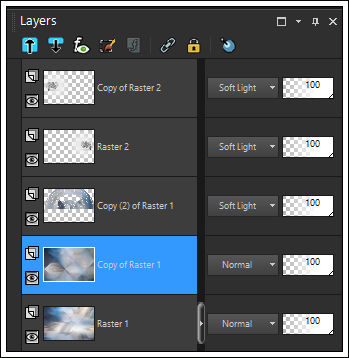
13- Ative a Layer << Copy of Raster 1>>
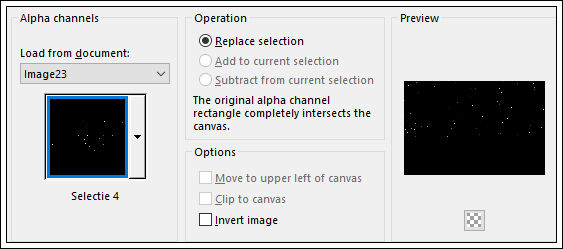
Selections / Load Save Selection / Load Selection From Alpha Channel: Selection #2
Layers / New Raster LayerEffects / 3D Effects / Drop Shadow: 0 / 0 / 80 / 40 / #000000
Selections / Select None
14- Ative a Layer << Copy of Raster 1>>
Layers / Duplicate
Adjust / Blur / Gaussian Blur / Radius 25
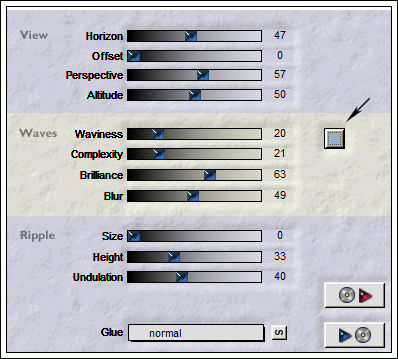
15- Effects / Plugin / Flaming Pear / Flood / Presets <<423_Preset_Flood>>
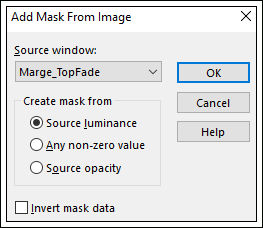
Layers / New Mask Layer / From Image: Marge_TopFade
Layers / Merge / Merge Group
17- Selections / Load Save Selection / Load Selection From Alpha Channel: Selection #2
Selections / Invert
Edit / Cut ... Ou Delete no teclado
Selections / Select None
18- Layers / Duplicate
Layers / Merge / Merge Down
Effects / Edge Effects / Enhance
Resultado:
19- Ative a layer <<Copy of Raster 1>>
Layers / New Mask layer / From Image: Marge_TopFade
Layers / Merge / Merge Group
20- Ative a Layer do Fundo << Raster 1>>
Adjust / Blur / Gaussian Blur / Radius 20
21- Ative a Layer do Topo
Abra o tube <<423_KaD_Text2 >>
Copie e Cole como nova layer
Objects / Align / Right
Blend Mode / Overlay
22- Selections / Load Save Selection / Load Selection From Alpha Channel: Selection #2
Edit / Cut ... Ou Delete no teclado
Selections / Select None
23- Layers / New Raster Layer
Selections / Load Save Selection / Load Selection From Alpha Channel: Selection #3
Preencha a Seleção com a cor do Primeiro Plano ( clique 2 vezes)
Adjust / Sharpness / Sharpen
24- Abra o tube <<423_KaD_Snow >>
Copie e Cole Como Nova Layer
Ferramenta Pick Tool (K) / Mode Escale / Posição de X e Y , conforme segue:
25- Layers / New Raster Layer
Selections / Load Save Selection / Load Selection From Alpha Channel: Selection #4
Preencha a Seleção com a cor do Primeiro Plano
Selections / Select None
26- Image / Add Borders / Symmetric Marcado / 1 pixel cor #26425f
Image / Add Borders / Symmetric Marcado / 3 pixels cor #FFFFFF
Image / Add Borders / Symmetric Marcado / 1 pixel cor #26425f
Image / Add Borders / Symmetric Marcado / 15 pixels cor #FFFFFF
Image / Add Borders / Symmetric Marcado / 1 pixel cor #26425f
Image / Add Borders / Symmetric Marcado / 3 pixels cor #FFFFFF
Image / Add Borders / Symmetric Marcado / 1 pixel cor #26425f
Selections / Select All
Image / Add Borders / Symmetric Marcado / 30 pixels cor #FFFFFF
27- Effects / 3D Effects / Drop Shadow: 0 / 0 / 40 / 20 / #26425f
Selections / Select None
28- Abra o tube <<KaD_WinterWoman20>> Copie e Cole como nova layer
Image / Resize / 88%... Resize all Layers ... Desmarcado
Ferramenta Pick Tool (K) / Mode Escale / Posição de X e Y , conforme segue:
29- Effects / 3D Effects / Drop Shadow: 0 / 7 / 50 / 34 / #000000
31- Abra o tube <<423_KaD_Text1>>
Copie e Cole Como Nova Layer
Ferramenta Pick Tool (K) / Mode Escale / Posição de X e Y , conforme segue:
Opacidade / 73%
30- Abra o tube <<423_KaD_Text3>>
Copie e Cole Como Nova Layer
Não Mova!
31- Coloque a sua Marca d'água ou sua assinatura
Image / Add Borders / Symmetric Marcado / 1 pixel cor #26425f
32- Image / Resize / 900 pixels de Largura ... Resize All Layers ... Marcado
Adjust / Sharpness Unsharp Mask
Salve como jpg.
Versão com tubes de Nicole (Le Monde De Bambou):
©Tutorial traduzido por Estela Fonseca em 14/10/2017.
Não alterar nem repassar sem autorização.