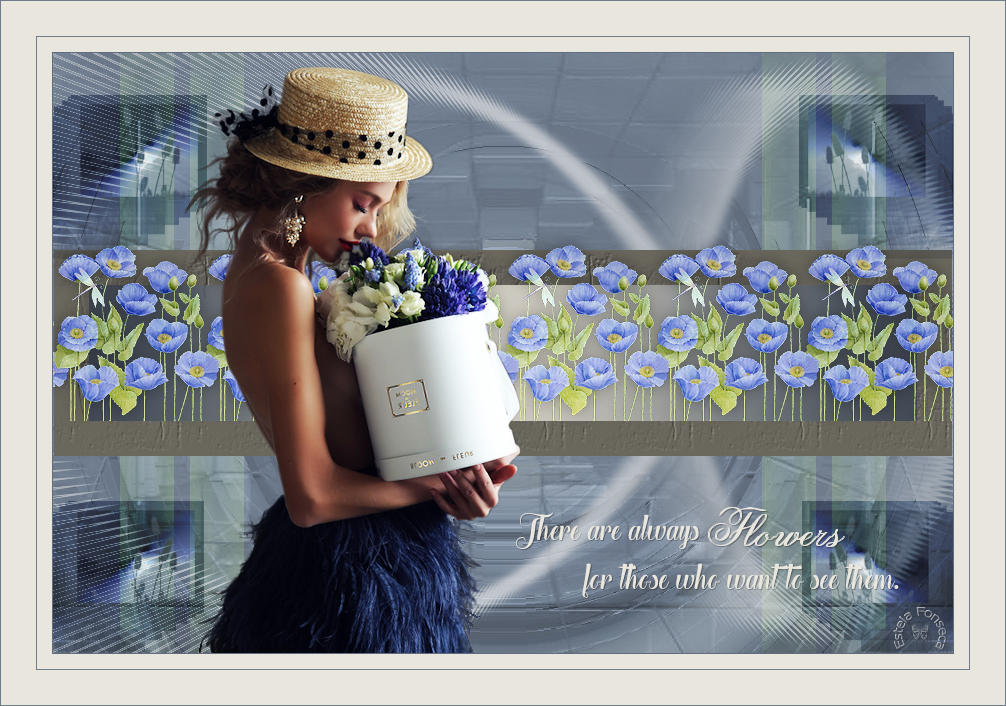
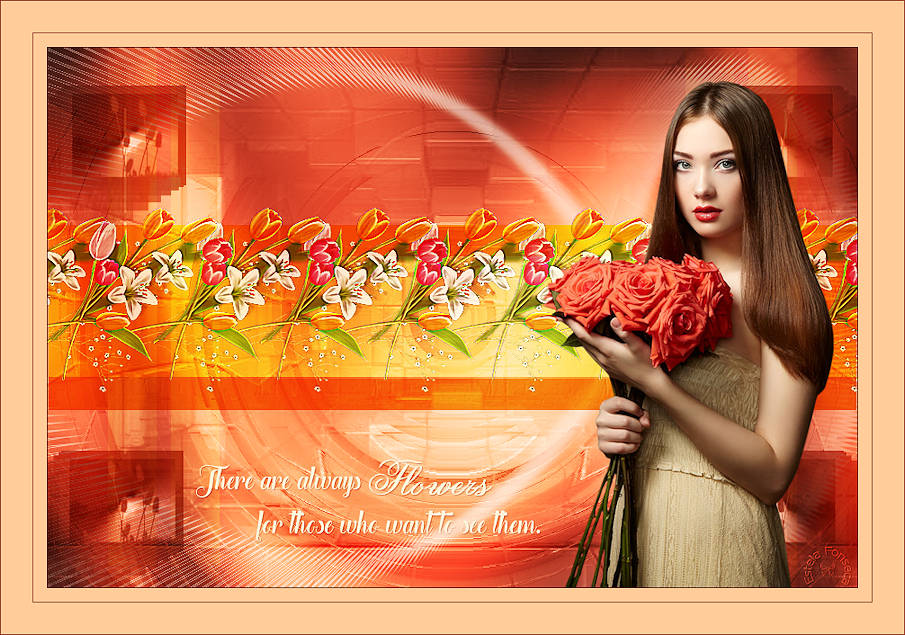
BRING ME FLOWERS
Tutorial de ©Narah - Original Aqui
Tutorial realizado na versão PSP X8.
Materiais Necessários:
Tube "2187 - woman - LB Tubes.pspimage" de Beatriz
Tube "blue-poppies-gcwts.psp"
Mask "Narah_Abstract004.jpg" e Narah_Nature003.jpg" de Narah( Coloque na pasta de Mask do PSP )
Texture "Textura2.dat" ( Coloque na pasta de Texturas do PSP )
Seleções "Narah_Sel_BringMeFlowers1.PspSelection,"Narah_Sel_BringMeFlowers2.PspSelection,""Narah_Sel_BringMeFlowers3" e "Narah_Sel_BringMeFlowers4"
( Coloque na pasta de Seleções do PSP )
Preset "Narah_BringMeFlowers_SpikyHalo"( Coloque na pasta de Presets do PSP )
Preset "Narah_BringMeFlowers_Backligh.fls
( Duplo clique e ele será automaticamente instalado na pasta do plugin )
Preset Narah_BringMeFlowers1_Utility.ini( Coloque na pasta do Plugin AP (Utility) )
Plugins Utilizados:AP (Utility)
Alien Skin Eye Candy 5: Impact
MuRa's Meister / Copies
UnPlugged Tools / Spotlight y Light
Filtro Toadies / What are You?
Preparação:Abra os tubes no PSP duplique e feche o original.
01- Primeiro Plano cor #6a727d / Segundo Plano cor #ddd9d0
02 - Abra uma nova imagem transparente de 900 / 600 pixels
Preencha com a cor #6a727d03 - Layers / New Raster layer
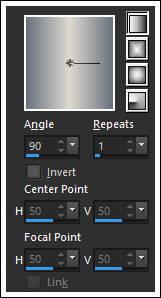
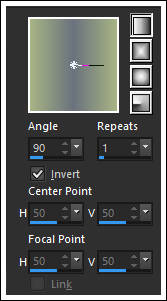
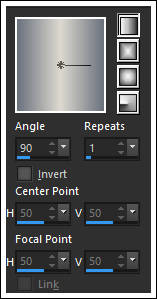
Configure um Gradiente estilo <<Linear>> angle: 90°/Repeats: 1
04 - Adjust / Blur / Gaussian Blur / Radius 50
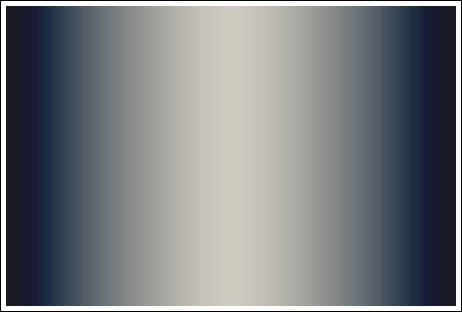
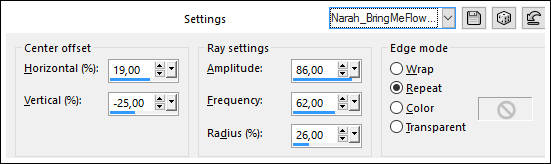
05 - Effects / Plugin / AP Utility / Reflections / Preset Narah_BringMeFlowers1
Clique em <<Open Preset>> e Localize o preset na pasta do material
Após aplicar esse será o resultado:
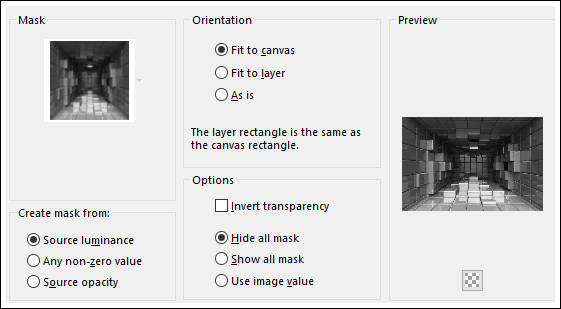
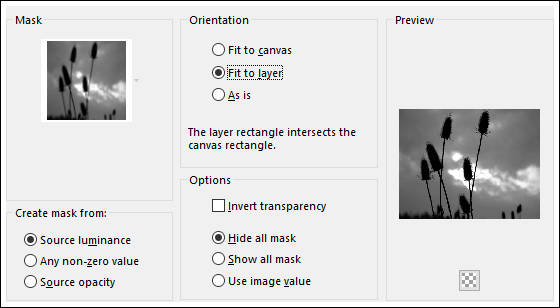
06 - Layers / Load save mask / Load Mask from disk: Narah_Abstract004.jpg
Effects / Edge Effects / Enhance
Layers / Merge / Merge Group
07 - Repita o passo N°5 / AP Utility / Reflections / Preset Narah_BringMeFlowers1
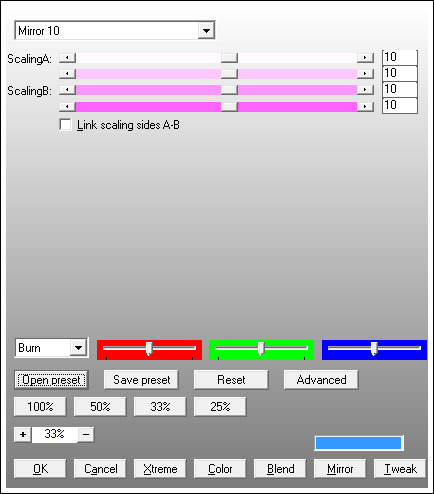
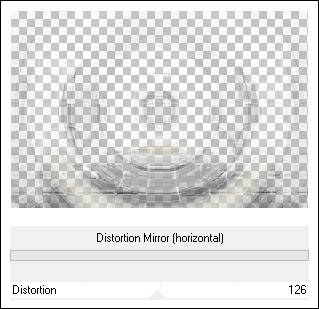
08 - Effects / Plugin / Unlimited 2.0 / Tile & Mirror / Distortion Mirror (Horizontal) / 126
Blend Mode / Overlay
Opacidade / 50%
09 - Primeiro Plano cor #6a727d e Segundo Plano cor #a7b484
Layers / New Raster Layer
Configure um Gradiente estilo <<Linear>> Angle: 90°/Repeats: 1/ Invert Marcado
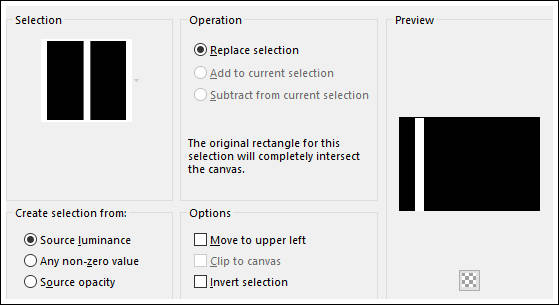
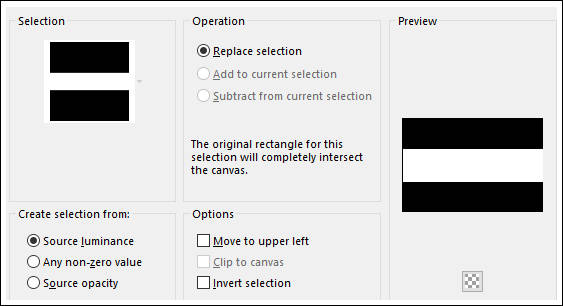
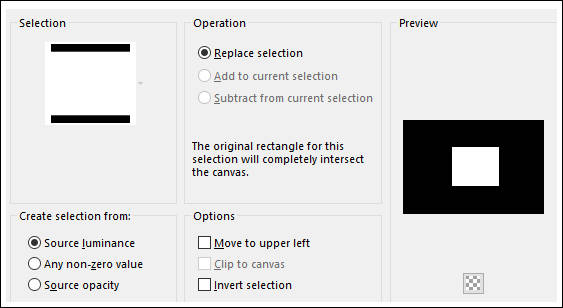
Selections / Load save selection / Load selection from disk: Narah_sel_BringMeFlowers 4.PspSelection
Mude a opacidade do baldinho de pintura para 60%
Preencha com o Gradiente
Selections / Select None
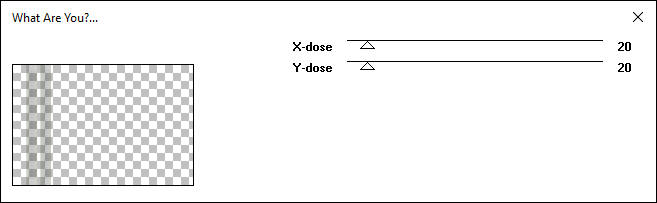
10 - Effects/ Plugin / Toadies / What Are You?
Blend Mode / Overlay
Opacidade / 75%
Layers / DuplicateImage / Mirror
Volte a opacidade do <<Flood Fill>> para 100
11 - Layers / New Raster layer
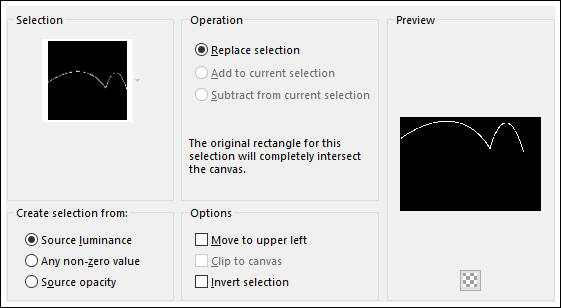
Selections / Load save selection / Load selection from disk: Narah_sel_BringMeFlowers 1.PspSelection
12 - Effects/ Plugin / Alien Skin Eye Candy 5 / Impact / Backlight / Preset Narah_BringMeFlowers_Backlight
Selections / Select none
13 - Effects/Distortion Effects / Spiky Halo / preset Narah_BringMeFlowers_Spiky Halo
14 - Layers / Duplicate
Image/Flip
Layers / Merge / Merge DownBlend Mode / Screen
Opacidade / 50%
15 - Layers / New Raster Layer
Selections / Load save selection / Load selection from disk: Narah_sel_BringMeFlowers 2.PspSelection
Segundo Plano cor #ddd9d0
Preencha a seleção com a cor #ddd9d0
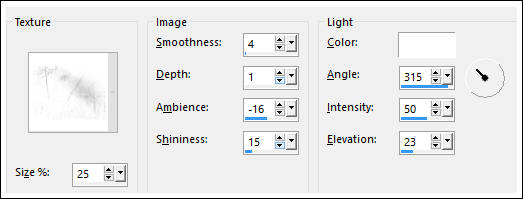
16 - Effects/ Texture Effects /Textures: Texture2.dat
Mantenha a Seleção!!!!
17 - Selections / Modify / Contract / 35 pixels
Delete no teclado
Preencha com o Gradiente estilo <<Linear>> angle: 90°/Repeats 1
Adjust / Blur / Gaussian Blur / Radius 50
Selections / Select NoneLayers / Duplicate
Blend Mode / Multiply
Opacidade / 50%
18 - Ative o tube <<blue-poppies-gcwts.psp>>
Copie e Cole como nova layer
Image / Resize / 35% (resize all layers desmarcado)
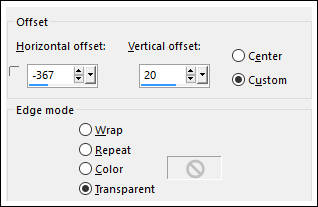
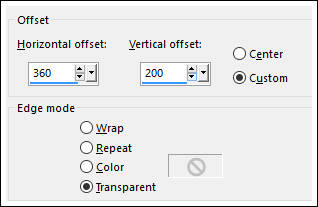
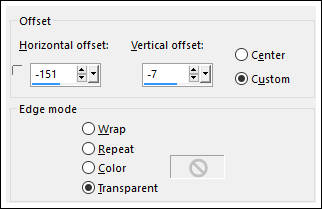
Effects / Image Effects / Offset:
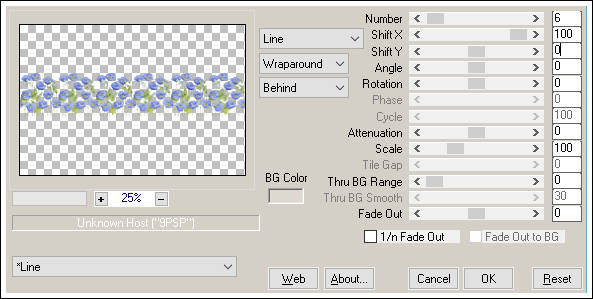
19 - Effects/ Plugin / MuRa's Meister / Copies:
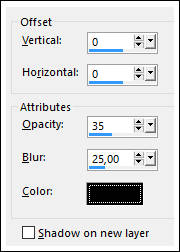
Effects / 3D Effects / Drop shadow: 0/0/35/25/cor #000000
Opacidade / 80%
21 - Layers / New Raster LayerSelections / Load save selection / Load selection from disk: Narah_sel_BringMeFlowers 3.PspSelection
Preencha com a cor #6a727d
Effects / Texture Effects / Textures / Igual ao passo n°16
22 - Selections / Modify / Contract / 20 pixels
Layers / New Raster LayerPreencha com o Gradiente estilo <<Linear>> angle: 90°/Repeats 1
Adjust / Blur / Gaussian Blur / Radius 50
23 - Layers / New Mask layer / From Disk: Narah_Nature003.jpg
Layers / Merge / Merge group
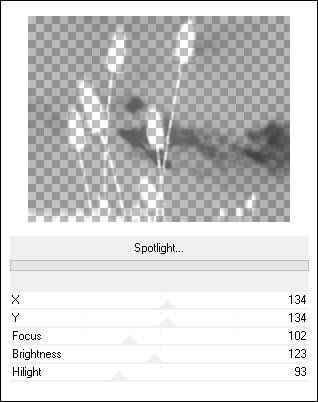
24 - Effects/ Plugin / UnPlugged Tools / Spotlight :
Effects/ Plugin / UnPlugged Tools / Light:
Layers / Merge / Merge down
Selections / Select None
25 - Image/Resize / 45% (Resize all layers desmarcado)
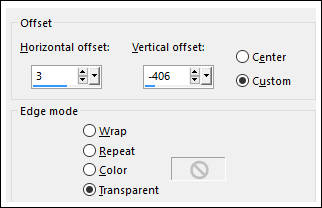
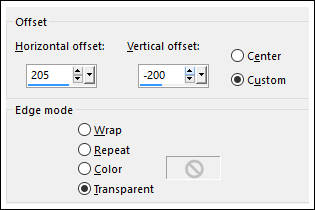
Effects / Image Effects / Offset:
19 - Effects/Plugin /MuRa's Meister/Copies:
Layers / Duplicate
Effects /Image Effects / Offset
Layers / Merge / Merge down
Layers / Duplicate
Image / Mirror
Layers / Merge / Merge Down
Blend Mode / Overlay
Opacidade / 70%
27 - Abra o tube << 2187 - woman - LB Tubes.pspimage>>
Copie e Cole como nova layer
Image / Mirror
Image / Resize / 90% (Resize all layers desmarcado)
Effects /Image Effects / Offset
28 - Ative o tube <<Narah_WordArt_Flowers.pspimage>>Copie e Cole como nova layer
Effects /Image Effects / Offset
Effects/ 3D Effects / Drop Shadow: 1/1/25/1/cor #000000Layers / Opacidades:
29 - Image/Add Borders / Symmetric Marcado / 1 pixel cor #6a727d
Image/Add Borders / Symmetric Marcado / 15 pixels cor #ddd9d0
Image/Add Borders / Symmetric Marcado / 1 pixel cor #6a727d
Image/Add Borders / Symmetric Marcado / 35 pixels cor #ddd9d0
Image/Add Borders / Symmetric Marcado / 1 pixel cor #6a727d30 - Ative o tube da marca d'água de Narah
Copie e Cole como nova layer
31 - Coloque a sua assinatura
32 - Layers / Merge / Merge All
33 - Export como JPGVersão com tube de Karine Dreams:
© 2016 Tutorial criado por Narah e Traduzido por Estela Fonseca.
Não alterar nem repassar sem autorização.