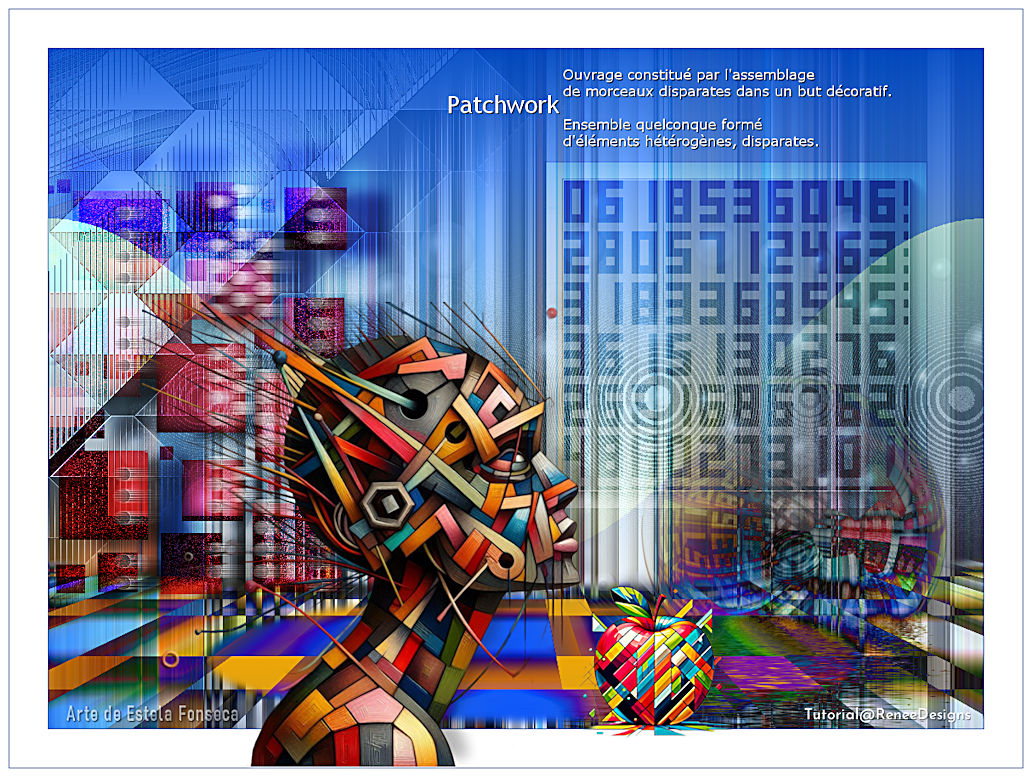
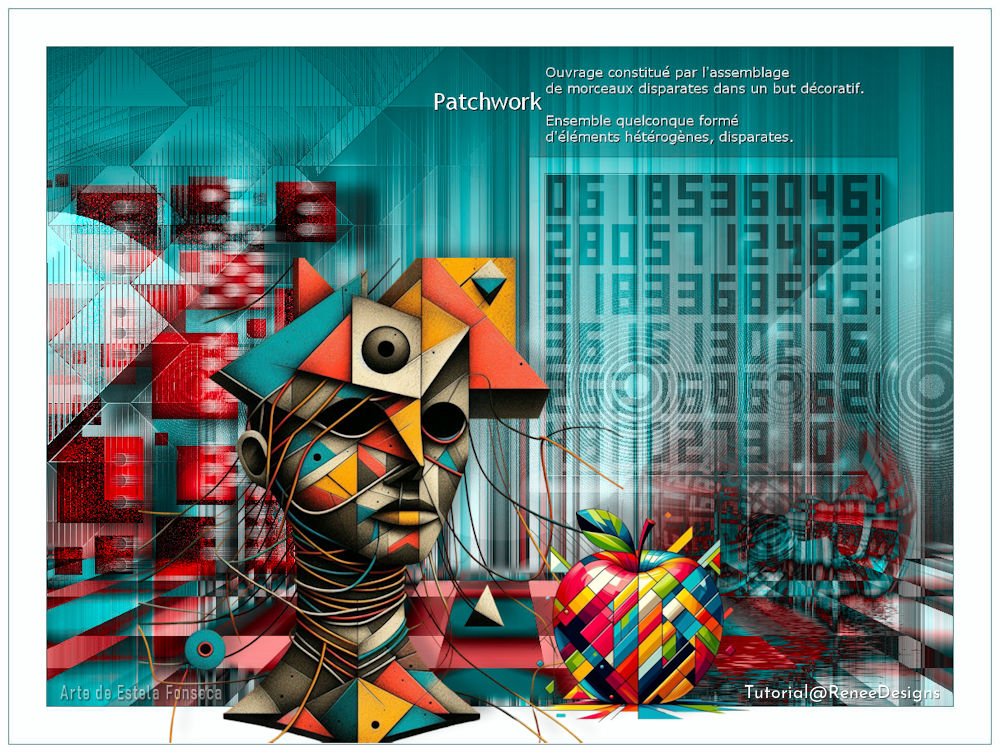
PATCHWORK GEOMETRIC
Tutorial de Renée Graphic , original, Aqui.
O tutorial foi traduzido na versão Corel Paint shop Pro 2022, mas ele pode ser feito com outras versões.
Materiais Necessários:
Tubes de Renée...
ATENÇÃO:
Aviso de Renée*
Se for sua intenção compartilhar esses tubes ou essas lições em grupo, peça permissão ao proprietário.
O tube não pode ser enviado sem a aula.Por favor, não faça alterações no tube, pois este tube foi feito apenas para
esta lição.
É proibido compartilhar este tutorial sem link para a lição original.
Muito obrigado.Renée.
Eles estão a disposição em seu site: AQUI.
PLUGINS
Atenção
Lembrete Se você usar o Filter Unlimited 2.3, de Renée, ele consiste em 3 pastas
Dê uma olhada nas pastas antes de adicionar uma predefinição.
L & K's Patche
Transparency
Alien Skin EyeCandy 5 Impact
Medhi
VM Natural
Muras Meister
AAA Frame
Flaming Pear
VM Toolbox
Plugins de Renée ... AQUI..
As cores podem variar significativamente dependendo do PSP utilizado.
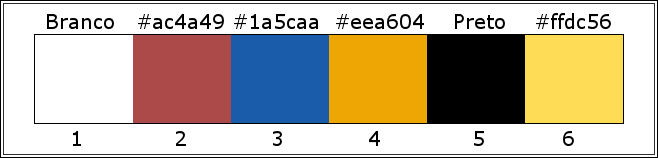
Estilos e Texturas ... Primeiro Plano cor branca e Plano de fundo cor N°2
1. Abra uma nova imagem transparente de 1100 x 800 Pixels.
2. Preencha com a cor branca.
3. Layers / New Raster Layer.4. Selections / Select All.
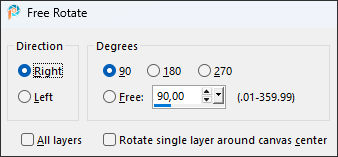
5. Abra a imagem "Patchwork-Geometrique-Image 1" copie e cole na seleção.
Selections / Select None
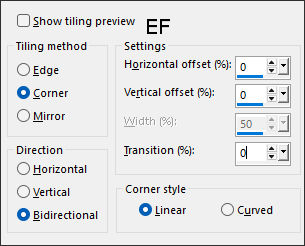
6. Effects / Image Effects / Seamless Tiling:
Layers / Merge / Merge Down.
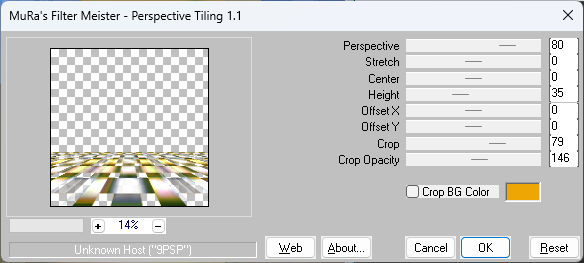
7. Effects / Plugins / L & K's / Raisa : ( 165 / 0 )
8. Effects / Plugins / Transparency / Eliminate White
9. Layers / Merge / Merge All.
10. Layers / Duplicate
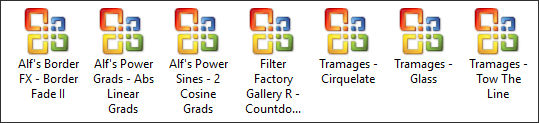
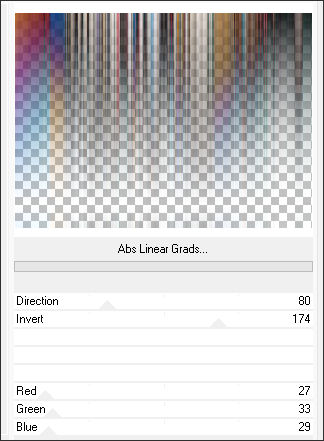
11. Effects / Plugins / Filters Unlimited 2.0 / Alf's Power Grads / Abs Linear Grads... Default.
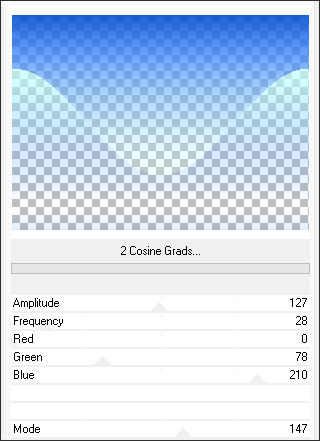
12. Effects / Plugins / Filters Unlimited 2.0 / Alf's Power Sines / 2 Cosine Grads...
13. Layes / New Raster Layer
14. Selections / Load save selection / Load selection from disk: "Patchwork-geometrique-1"15. Effects / 3D Effects / Cutout ... Cor Preta (#000000) e Cor N°2
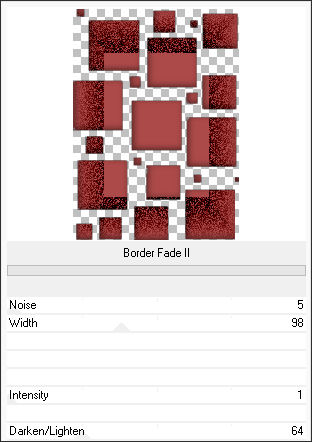
16. Effects / Plugins / Filters Unlimited 2.0 / Alf's Border FX / Border Fade II
Selections / Select None
17. Effects / 3D Effects / Drop Shadow: 8/48/25/25 Preto
18. Blend Mode / Overlay
19. Layers / Duplicate
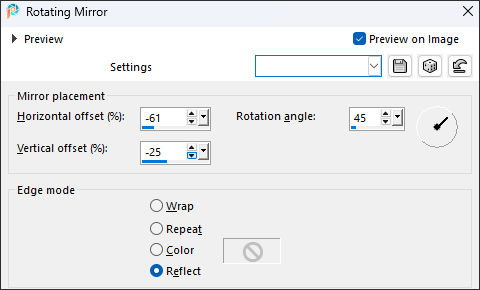
20. Effects / Reflection Effects / Rotating Mirror
21. Effects / 3D Effects / Drop Shadow: -52 /- 25 / 25 / 25 Branco
22. Layers / New Raster layer
23. Selections / Load save selection / Load selection from disk: "Patchwork-geometrique-2"24. Balde de pintura (Opacidade 50) Preencha a seleção com a cor branca
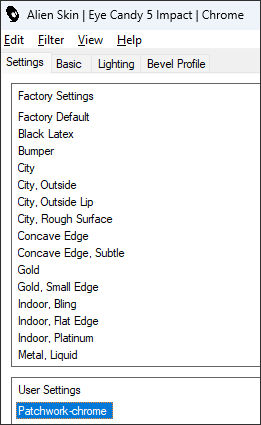
25. Effects / Plugins / Alien Skin Eye Candy 5 / Impact / Chrome ... Preset : "Patchwork-chrome"
Selections / Select None
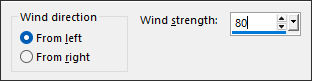
26. Effects / Distortion Effects / Wind
27. Effects / Edge Effects / Enhance MoreEstilo e Texturas ... Primeiro Plano cor N°3 e Plano de Fundo cor N°6
28. Layers / New Raster layer
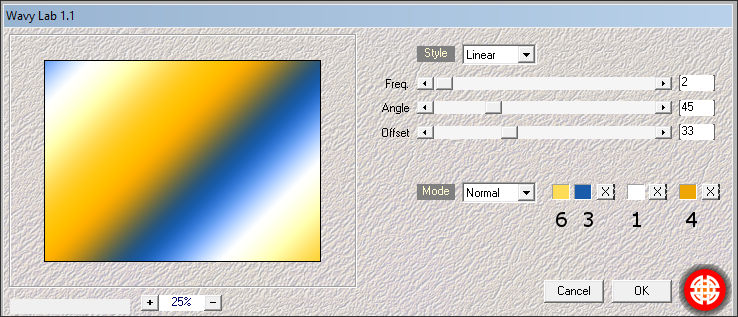
29. Effects / Plugins / Medhi / Wavy Lab 1.1
30. Adjust / Blur / Gaussian Blur / Radius 80
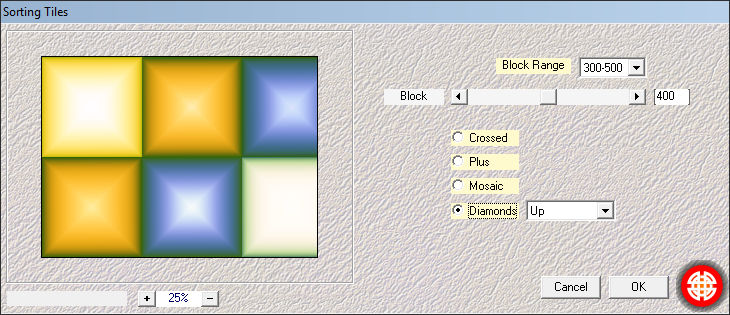
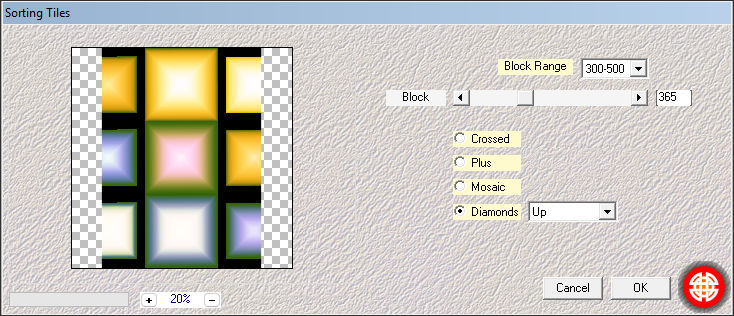
31. Effects / Plugins / Medhi / Sorting Tiles
32. Image / Free Rotate:
33. Effects / Plugins / Medhi / Sorting Tiles
34. Effects / Image Effects / Seamless Tiling...
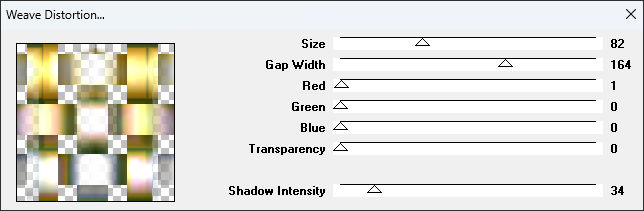
35. Effects / Plugins / VM Natural / Weave Distorsion
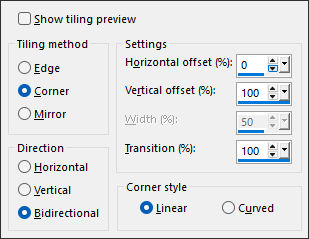
36. Effects / Plugins / Muras Meister / Perspective Tiling
37. Blend Mode / Difference
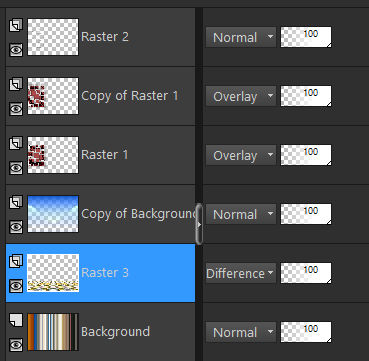
38. Layers / Arrange / Move Down ... coloque sobre a layer do Fundo
39. Selections / Load save selection / Load selection from disk: "Patchwork-geometrique-3"
Delete no Teclado ... 3 VezesSelections / Select None
Ative a Layer do Fundo
40. Selections / Load save selection / Load selection from disk: "Patchwork-geometrique-7"
Delete no Teclado ... 3 Vezes
Selections / Select None
Ative a Layer do Topo
41. Layers / New Raster Layer
42. Selections / Load save selection / Load selection from disk: "Patchwork-geometrique-4"ATENÇÃO: Salve seu trabalho, pois se houver algum problema com o efeito de bolha, o PSP será fechado.
Se houver algum problema, "bubble-effects-if-problem" está na pasta, cole-o na seleção 4.
(Não aplique a seleção 5 se você colar o efeito na seleção 4.)43. Effects / Artistic Effects / Balls and Bubbles / Preset : "Patchwork-bulles"
( coloque dentro da pasta de presets do psp)
44. Selections / Load save selection / Load selection from disk: "Patchwork-geometrique-5"45. Layers / Arrange / Move Down ... até ficar sobre a layer ...Raster 3 (Solo)
Ative a Layer do TOPO
46. Layers / New Raster Layer
47. Selections / Load save selection / Load selection from disk: "Patchwork-geometrique-6"
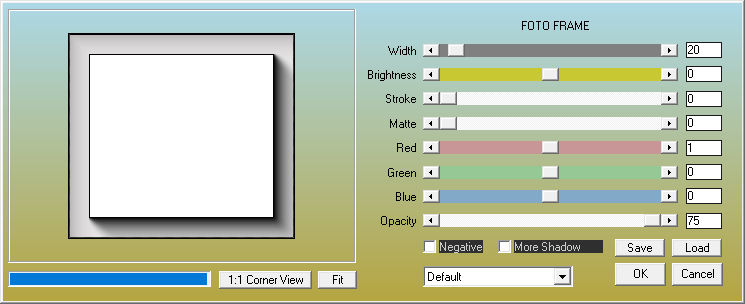
48. Baldinho de Pintura / Opacidade 100% / Preencha a seleção com a cor branca49. Effects / Plugins / AAA Frame / Foto Frame
50. Selections / Modify / Contract / 22 Pixels
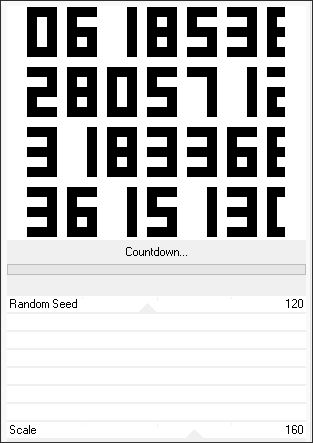
51. Effects / Plugins / Filters Unlimited 2.0 / Filter Factory Gallery R / Countdown: 120/ 160
52. Effects / Plugins / Transparency / Eliminate White
53.Blend Mode / OverlayOpacidade 53
Selections / Select None
54. Ative o tube "renee-texte-Patchwork" Copie e cole como nova layer
Posicione no alto à direita.
55. Effects / 3D Effects /Drop Shadow: 1/1/100/0 Preto
Estilos e Texturas... Primeiro Plano cor branca e Plano de Fundo cor PretaAtive a Layer do Fundo
56. Ative a Régua
57. Selections / Select All (vai ficar vermelho)
58. Ative a Ferramenta Airbrush e configure como segue...
Mova o ponteiro do mouse para a marca 400 na borda esquerda, depois clique com o botão direito e arrastepara a borda direita.
59. Selections / Edit Selections (volta ao normal)
60. Selections / Invert61. Layers / New Raster layer
62. Balde de pintura / Opacidade 50 / Preencha a seleção com a cor branca
63. Effects / Plugins / Filters Unlimited 2.0 / Tramages / Cirquelate... 166Ative a Layer do TOPO
64. Edit / Copy Special / Copy Merged
65. Cole como nova layer
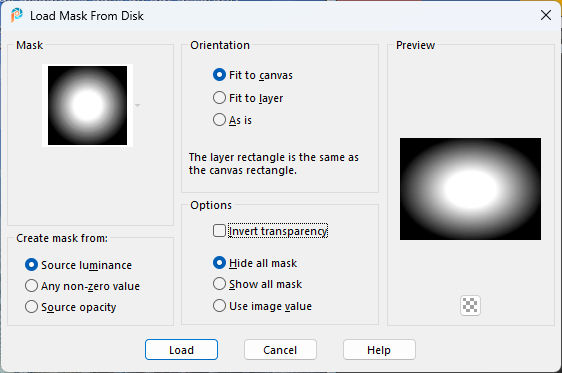
66. Layers / Load save mask / Load mask from disk:"20/20"
Layers / DuplicateLayers / Merge / Merge Group
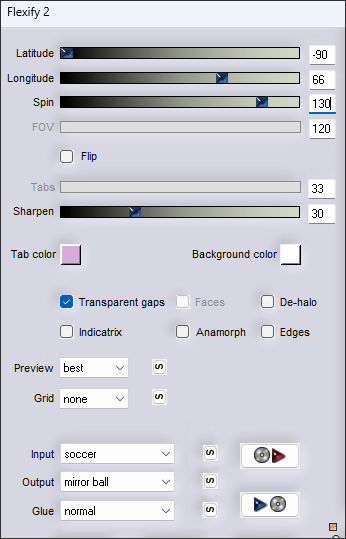
67. Effects / Plugins / Flaming Pear / Flexify 2
68.Image / Resize / 45% - Resize all Layers ...Desmarcado
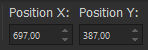
69. Pick (K) - Position X (697,00) / Position Y (387,00) - Tecla"M" desativa a Pick
70. Effects / Plugins / Flaming Pear / Flood
71. Blend Mode / Difference ou outro dependendo de suas cores
Ative a Layer do Fundo72. Layers / Duplicate
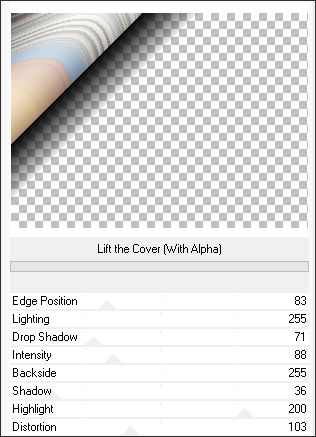
73. Effects / Plugins / (ou Unlimited ) / VM Toolbox / Lift the Cover (With Alpha)
74. Effects / Plugins / Filters Unlimited 2.0 / Tramages / Tow The Line...Defaut
75. Effects / Plugins / Filters Unlimited 2.0 / Tramages / Glass...11/73/0
76. Effects / Edge Effects / Enhance More77. Image / Add Borders / Symmetric Marcado / 1 Pixel cor N° 3
78. Image / Add Borders / Symmetric Marcado / 45 Pixels Cor brancaImage / Add Borders / Symmetric Marcado / 1 Pixel cor N° 3
Image / Add Borders / Symmetric Marcado / 10 Pixels Cor branca
79. Para decorar escolha dois tubes copie e cole como nova layer
Redimensione se necessário
80. Aplique uma sombra de sua escolha
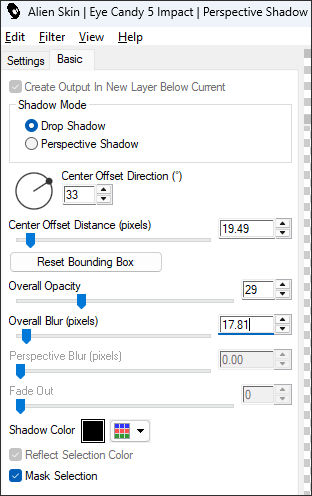
Minha escolha:Effects / Plugins / Alien Skin EyeCandy 5 / Impact / Perspective Shadow
81. Coloque a assinatura da autora (Renée)
82. Layers / Merge / Merge All
83. Image / Resize / 1000 Pixels de largura ...Resize All Layers...MARCADO.
Salve como JPG.Tubes de Renée...
©Tutorial traduzido por Estela Fonseca em 04/06/2025.
Não alterar nem repassar sem autorização.