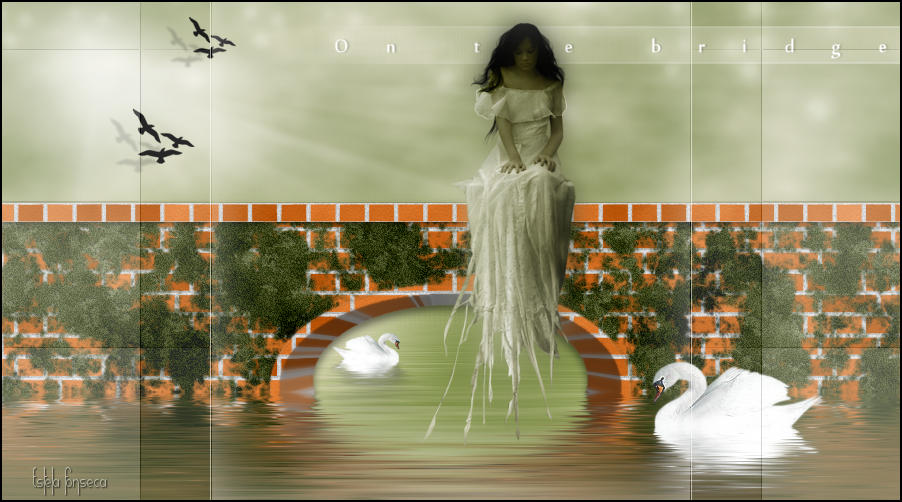
on the bridge
[ tutorial de @nn TDstudio 2013 ]

O tutorial traduzido no Corel Paint shop Pro X8.
Material Necessário:
Tube de Annelies para A&K Tubes Unlimited.
Plugins Utilizados:
Xero - FritillaryMuRa's Meister - Cloud
Flaming Pear - Flood
Alien Skin Eye Candy 5 - Textures , Nature e Impact
Preparação:
Duplo clique no Preset do Alien Skin Eye Candy 5 , ele será importado automaticamentepara a pasta do plugin.
Coloque as seleções na pasta de Seleções do PS
Flood Presets coloque na pasta de sua preferência
NOTA: Se trabalha com outros tubes e imagens ,redimensione-os para os mesmos tamanhos dos usados no tutorial.
Nota: Ao trabalhar com suas próprias cores, brinque com o Blend Mode e / ou opacidade a seu critério.
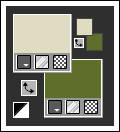
Primeiro Plano cor #e0dcc2
Segundo Plano cor #5d6f29
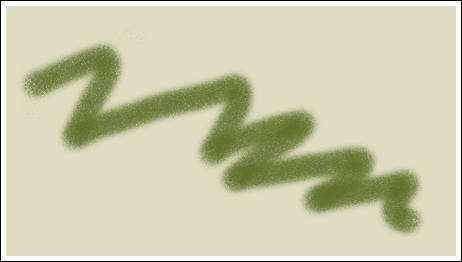
01- Abra uma nova imagem transparente de 900/500 pixels
Preencha com a cor do Primeiro Plano
Layers / New Raster Layer
Ferramenta <<Airbrush Tool>>
Faça um zigzag com a cor do segundo plano (Clique direito do Mouse):
Adjust / blur / Gaussian Blur / Radius 50
02- Layers / Duplicate
Effects / Plugins / Xero / Fritillary
Blend Mode / Hard LightOpacidade / 50
Layers / Merge / Merge All (flatten)03- Layers / Duplicate
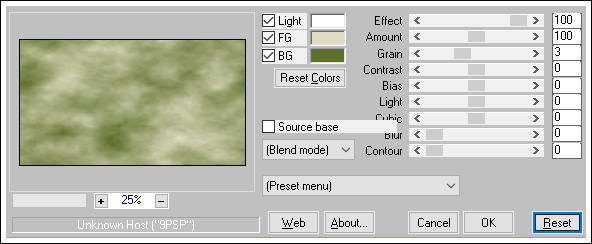
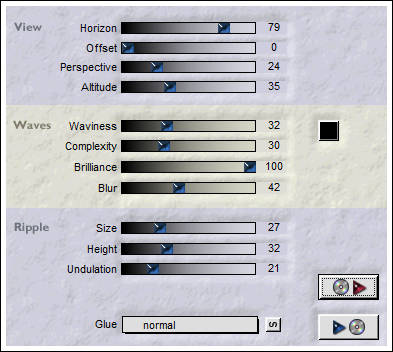
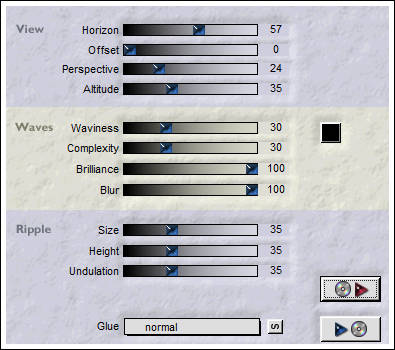
Effects / Plugins / MuRa's Meister / Cloud
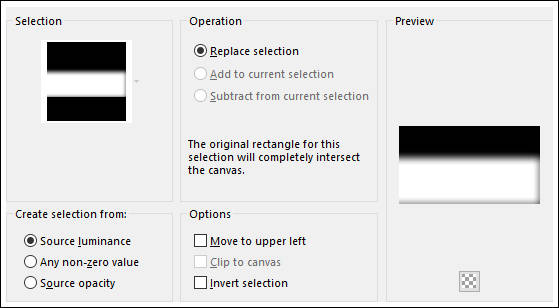
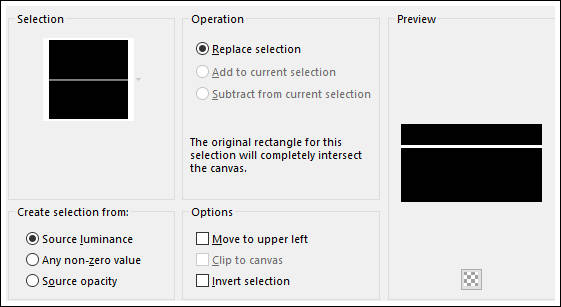
Selections / Load/Save Selection / Load Selection From Disk : @nn_160213_Sel_001_OnTheBridge_tdstudio
Edit / Cut (Ou delete no teclado)
Selections / Select None
Opacidade / 7504- Layers / Duplicate
Effects / Illumination Effects / Sunburst
Adjust / Blur / Gaussian Blur / Radius 4
Layers / Merge / Merge All (flatten)
05- Window / Duplicate (ou shift+D) / Minimize e volte para o original
Effects / Plugins / Flaming Pear / Flood / Clique na seta vermelha e localize o presetPreset @nn_160213_preset_flood_OnTheBridge_001_tdstudio.q8r
06- Layers / New Raster Layer
Selections / Load/Save Selection / Load Selection From Disk : @nn_160213_Sel_002_OnTheBridge_tdstudio
Preencha com a cor do Primeiro Plano
Selections / Select None
Effects / Plugins / Alien Skin Eye Candy 5 / Textures / Brick Wall /Preset Ann_160213_OnTheBridge_EC5_TBW_tdstudio.f1s
Effects / Plugins / Alien Skin Eye Candy 5 / Nature / Rust / Preset Ann_160213_OnTheBridge_EC5_NR.f1s
07- Layers / New Raster Layer
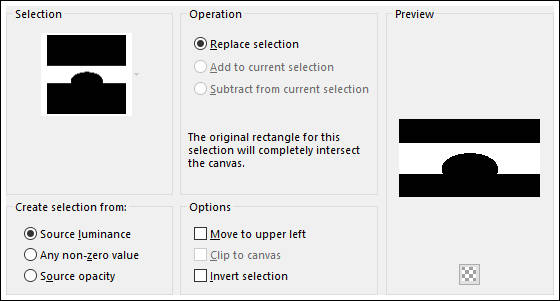
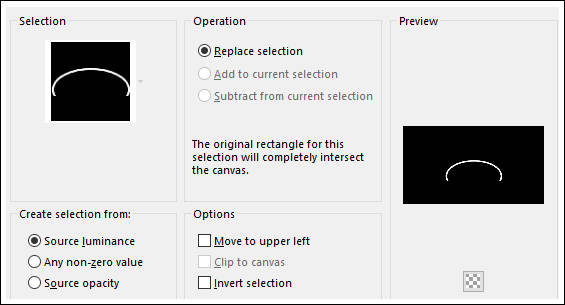
Selections / Load/Save Selection / Load Selection From Disk : @nn_160213_Sel_003_OnTheBridge_tdstudio
Preencha com a cor do Primeiro Plano
Selections / Select NoneEffects / Plugins / Alien Skin Eye Candy 5 / Textures / Brick Wall /
Preset Ann_160213_OnTheBridge_EC5_TBW_tdstudio.f1s
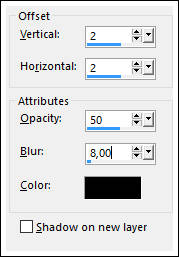
Effects / 3D Effects / Drop Shadow : Cor #000000
08- Layers / New Raster Layer
Selections / Load/Save Selection / Load Selection From Disk : @nn_160213_Sel_004_OnTheBridge_tdstudio
Preencha com a cor do Primeiro Plano
Selections / Select NoneEffects / Plugins / Alien Skin Eye Candy 5 / Textures / Brick Wall /
Preset Ann_160213_OnTheBridge_EC5_TBW_tdstudio.f1s
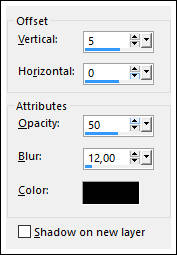
Effects / Plugins / Alien Skin Eye Candy 5 / Impact / Extrude / Preset Ann_160213_OnTheBridge_EC5_IE.f1sEffects / 3D Effects / Drop Shadow : #000000
Layers / Merge / Merge Down
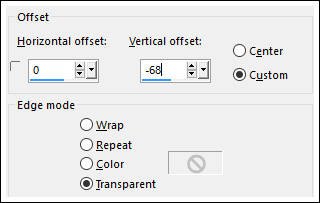
Edit / Repeat Layers Merge DownEffects / Image Effects / Offset
Effects / Plugins / Flaming Pear / Flood / Clique na seta vermelha e localize o preset
@nn_160213_preset_flood_OnTheBridge_002_tdstudio.q8r
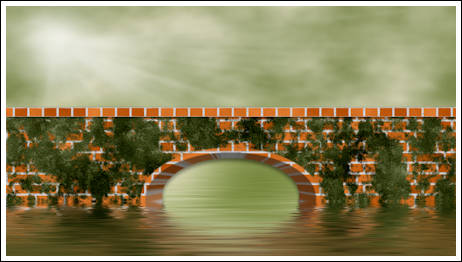
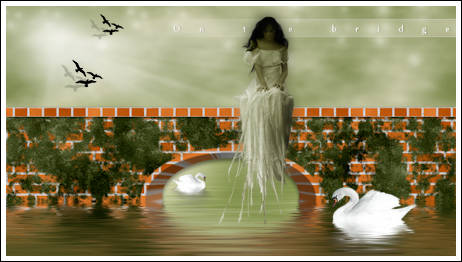
Resultado:
09- Abra o tube <<@nn_160213_sparkleblur_Onthebridge_tdstudio.pspimage>>
Copie / Cole como Nova Layer
Posicione:
Blend Mode / Soft Light
10- Abra o tube <<@nn_160213_textart_Onthebridge_tdstudio.pspimage>>
Copie / Cole como Nova Layer
Posicione:
11- Abra o tube <<@nn_160213_birds_Onthebridge_tdstudio.pspimage>>
Copie / Cole como Nova Layer
Posicione:
12- Abra o tube <<Alies_swan_onthebridge.pspimage>>
Copie / Cole como Nova Layer
Não Mova!!!
Effects / Plugins / Flaming Pear / Flood / Clique na seta vermelha e localize o preset
@nn_160213_preset_flood_OnTheBridge_002_tdstudio.q8r
Posicione:
Layers / Duplicate
Image / Resize / 40% .. Resize all Layers desmarcado
Image / Mirror / Mirror Horizontal ( Image / Mirror )
Posicione:
14- Abra o tube <<@nn_170213_woman_ds_onthebridge_tdstudio.pspimage>>
Copie e Cole como Nova Layer
Posicione:
Edit / Copy Special / Copy Merged
Abra o tube <<@nn_160213_frame_Onthebridge_tdstudio.pspimage>>Cole como nova Layer
Layers / Arrange / Move Down
Layers / Merge / Merge All (Flatten)
Adicione a sua Marca d'água ou seu nome.Salve como JPG
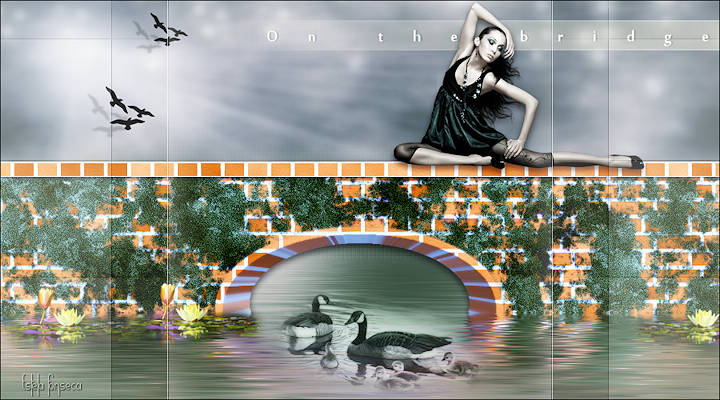
Outro Exemplo:
©Tutorial traduzido por Estela Fonseca em 10/10/2016.
Não alterar nem repassar sem autorização.