FRANIE
Tutorial de Valerie , original, Aqui.
.jpg)
Tutorial traduzido no PSP X8 mas pode ser feito em versões anteriores do PSP.
Materiais Necessários:
Tube de Franie Margot, seu site AQUI
A Mask é Narah, seu grupo AQUI
Plugins Utilizados:
AAA Frames / Foto FrameAlien Skin Eye Candy 5 / Impact
It@lian Editors Effect / Effetto Fantasma
L en K landksiteofwonders / L en K's Paris et L en K's Zitah
Toadies / What are you
Transparency / Eliminate White
VM Instant Art (Vernissage)
&<Bkg Kaleidoscope> / @BlueBerry Pie*Filter Factory Gallery B / Cut Glass*
*Importados para o Unlimited 2
Preparação:
Abra os tubes no PSP , duplique , minimize e feche os originais
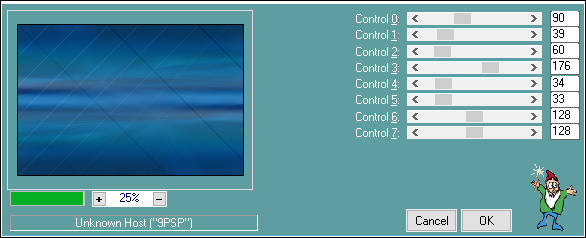
Duplo clique no preset do Alien Skin
Primeiro Plano cor 1 / Segundo Plano cor 2
1- Abra a Layer <<alpha-Franie-VSP>>Selections / Select all
Ative a imagem <<Fond>> Copie e Cole na Seleção
Selections / Select None
Layers / Duplicate
2- Ative a Layer do topo
Adjust / Blur / Radial Blur:
Layers / Duplicate
Image / Mirror / Mirror Horizontal
Image / Mirror / Mirror Vertical
Opacidade / 50%
Layers / Merge / Merge Down
Effects / Edge Effects / Enhance More
Effects / Plugin / L en K landksiteofwonders / L en K's Paris
Layers / Arrange / Move Down
3- Ative a Layer do Topo
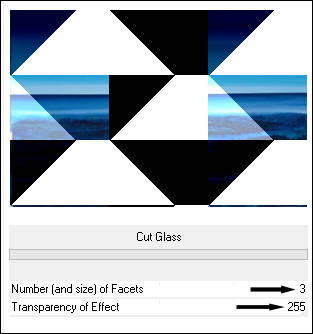
Effects / Plugin /<I.C.NET Software> Filters Unlimited 2.0 / Filter Factory Gallery B / Cut Glass
Effects / Plugin / Transparency / Eliminate White
Effects / Plugin / Alien Skin Eye Candy 5 / Impact / Perspective Shadow / Drop Shadow, blurry
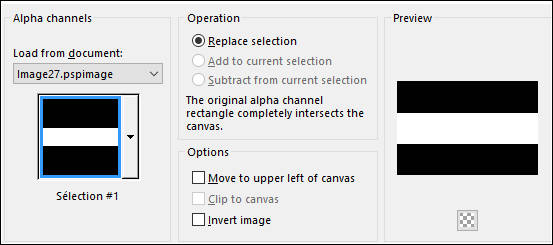
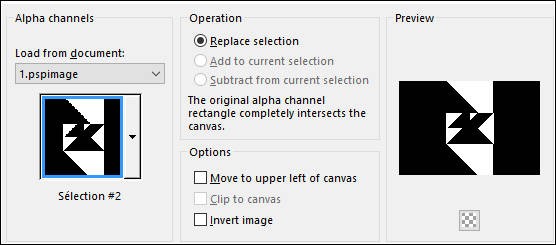
4- Selections / Load Save Selection / Load Selection From Alpha Channel: Selection#1
Selections / Promote Selection to Layer
Selections / Select None
Effects / Plugin / <I.C.NET Software> Filters Unlimited 2.0 / &<Bkg Kaleidoscope>/ @BlueBerry Pie
Effects / Plugin / Alien Skin Eye Candy 5 / Impact / Perspective Shadow/ Drop Shadow, Blurry
5- Ative o tube <<Deco-Franie-VSP1>>
Copie e Cole Como Nova Layer
Layers / Arrange / Move Down (2 vezes)
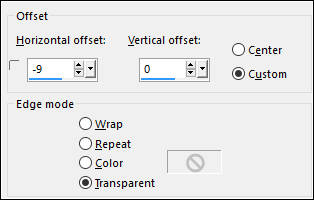
Effects / Image Effects / Offset:
Layers / Merge / Merge Visible
6- Selections / Load Save Selection / Load Selection From Alpha Channel: Selection#2
Effects / Plugin / L en K landksiteofwonders / L en K's Zitah
Selections / Select None
7- Selections / Load Save Selection / Load Selection From Alpha Channel: Selection#3
Selections / Promote Selection to Layer
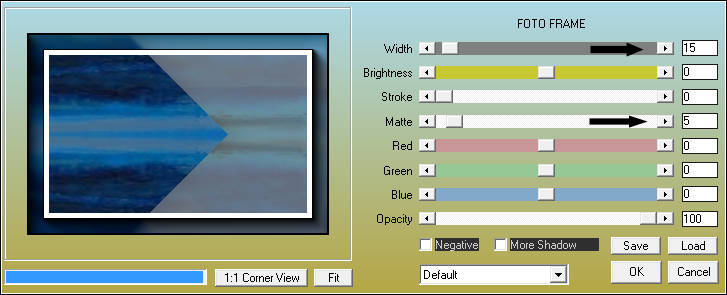
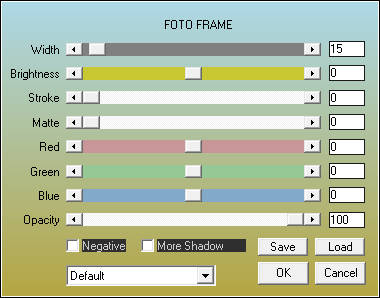
Effects / Plugin / AAA Frames / Foto Frame
Selections / Select None
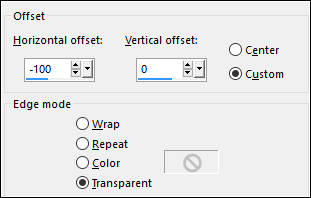
Effects / Image Effects / Offset: -100/0
Effects / Image Effects / Seamless Tiling
Layers / Duplicate
8- Segundo Plano cor ##170745
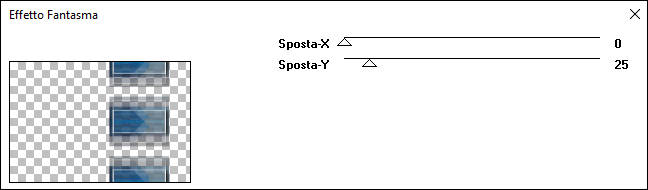
Effects / Plugin / It@lian Editors Effect / Effetto Fantasma
Layers / Arrange / Move Down
Ative a Layer do topo
Effects / Plugin / Alien Skin Eye Candy 5 / Impact / Perspective Shadow / Preset ShadowFranieVSP
9- Ative o tube <<Deco-Franie-VSP2>>
Copie e Cole como nova layer
Layers / Merge / Merge Down (2 vezes)
10- Ative a Layer do Fundo (Merged)
Layers / New Raster Layer
Preencha com a cor #4fa5d8
Layers / New Mask / Layers / From Image: Masque Narah_Mask_1045
Layers / Merge / Merge GroupEffects / Edge Effects / Enhance
Effects / 3D Effects / Drop Shadow
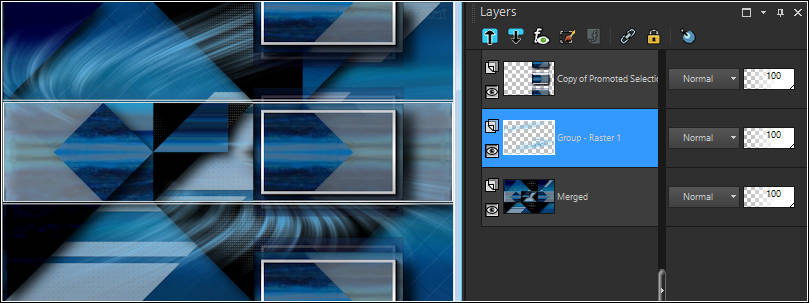
Resultado do seu trabalho e paleta das layers:
Layers / Merge / Merge Visible
11- Layers / New Raster layer
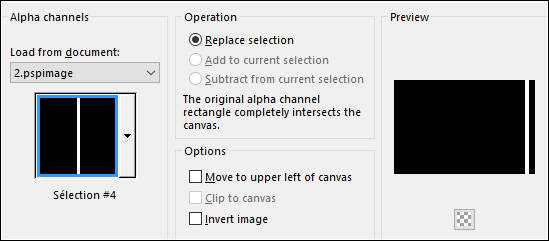
Selections / Load Save Selection / Load Selection From Alpha Channel: Selection#4
Preencha com a cor branca (#ffffff)
Selections / Select None
Coloque a cor branca no Segundo Plano (#ffffff)
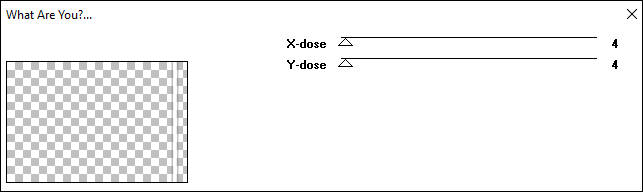
Effects / Plugin / Toadies / What are you ( 2 vezes)
12- Ative o tube <<Deco-Franie-VSP3>>
Copie e Cole Como Nova Layer
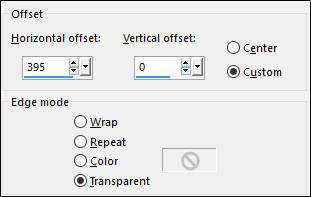
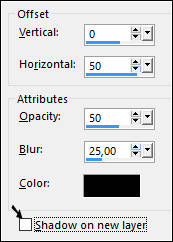
Effects / Image Effects / Offset: 395/0
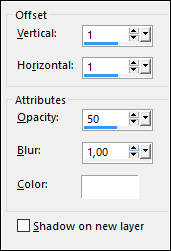
Effects / 3D Effects / Drop Shadow: 2/2/50/4 #000000
13- Ative o tube <<titre>>Copie e Cole como nova layer
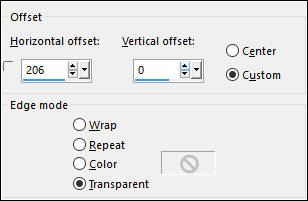
Effects / Image Effects / Offset: 206/0
Effects / 3D Effects / Drop Shadow: #4fa5d8
Effects / Edge Effects / Enhance
14- Image / Add Borders / Symmetric Marcado / 1 pixel cor #170475
Image / Add Borders / Symmetric Marcado / 1 pixel cor #ffffff
Image / Add Borders / Symmetric Marcado / 1 pixel cor #170475
Image / Add Borders / Symmetric Marcado / 10 pixels cor #ffffff
Image / Add Borders / Symmetric Marcado / 1 pixel cor #170475
Image / Add Borders / Symmetric Marcado / 1 pixel cor #ffffff
Image / Add Borders / Symmetric Marcado / 1 pixel cor #170475
Image / Add Borders / Symmetric Marcado / 30 pixels cor #ffffff
Image / Add Borders / Symmetric Marcado / 1 pixel cor #170475
Image / Add Borders / Symmetric Marcado / 1 pixel cor #ffffff
Image / Add Borders / Symmetric Marcado / 1 pixel cor #170475
Image / Add Borders / Symmetric Marcado / 25 pixels cor #170475
Image / Add Borders / Symmetric Marcado / 1 pixel cor #ffffff
15- Ative a Varinha Mágica e Selecione a Borda Branca do Meio
Effects / Plugin / AAA Frames / Foto Frame
Selections / Promote Selection to Layer
Selections / Select None
Image / Mirror / Mirror Horizontal
Image / Mirror / Mirror Vertical
Opacidade / 50%
Layers / Merge / Merge Visible
16- Ative o tube <<Deco-Franie-VSP4>>
Copie e Cole como Nova Layer
17- Ative o tube << woman_1158_franiemargot>>
Copie e Cole Como Nova layer
Image / Resize / 110 % ... Resize all layers desmarcado
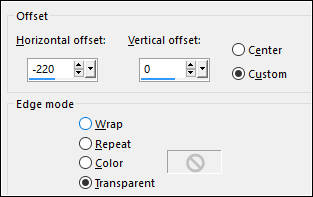
Effects / Image Effects / Offset: -220/0
Effects / 3D Effects / Drop Shadow: 0/50/50/25 #000000
18- Layers / Merge / Merge Visible
Image / Resize / 900 pixels de Larguura
Adjust / Sharpness / Unsharp Mask
19- Salve como JPG.
Versão com tube de Gabry:
©Tutorial traduzido por Estela Fonseca em 18/05/2017.
Não alterar nem repassar sem autorização.