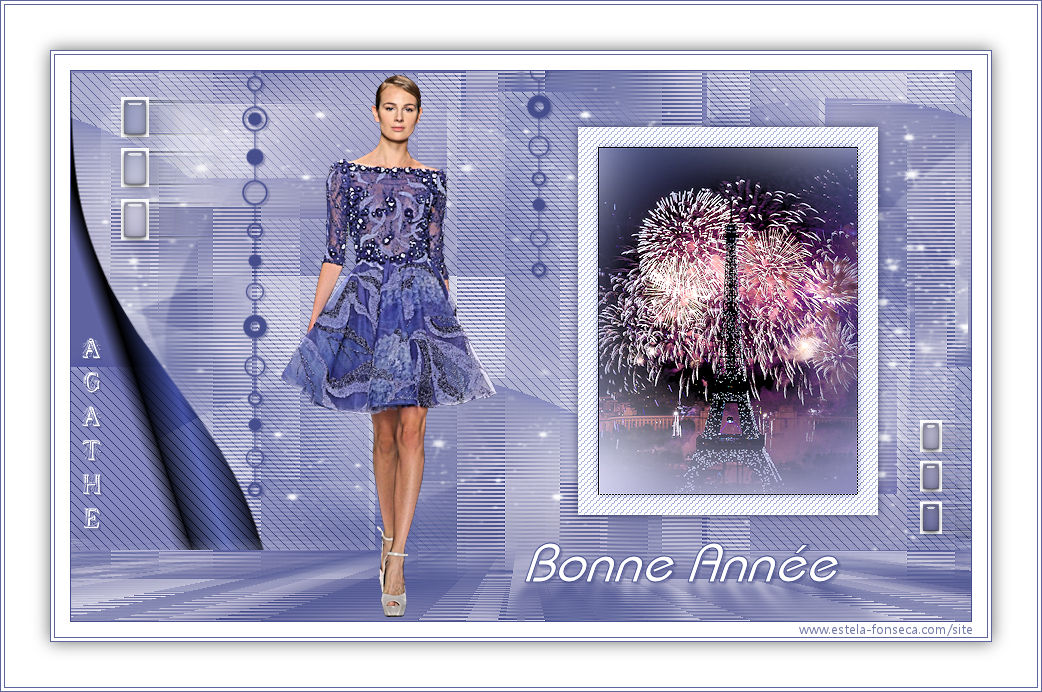
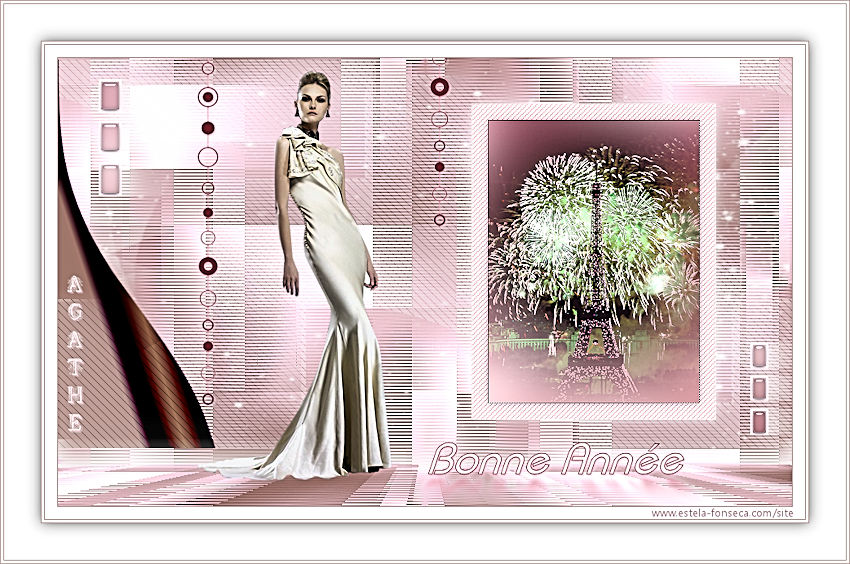
AGATHE
Tutorial de Violette Graphic , original, Aqui.

Tutorial realizado no PSP X9 mas pode ser feito em versões anteriores do PSP.
Materiais Necessários:
Tube de babette
Demais Materiais de @Violette
Plugins Utilizados:
Medhi/Waby Labs /Sorting Tiles
Unlimited/Distorsion Filters
Mura's Meister/perspectives Tiling
AAA Frame/Foto frame
Alien Skin Eye Candy 5 /Glass et Shadow
Vanderlee/Unplugged X/Zoomlens
AP Lignes/ Silverlining /Backslash
Preparação:
Abra os tubes no PSP , Duplique e feche os originais
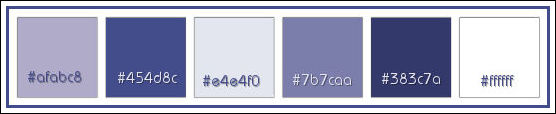
Tabela de Cores:
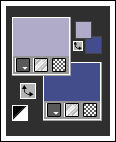
1 - Primeiro Plano cor #afabc8 e Segundo Plano cor #454d8c
2- Abra o arquivo << Vyp_Alpha_Agathe.pspimage>>
Duplique e feche o original
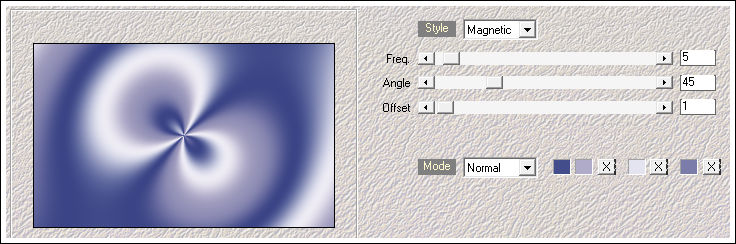
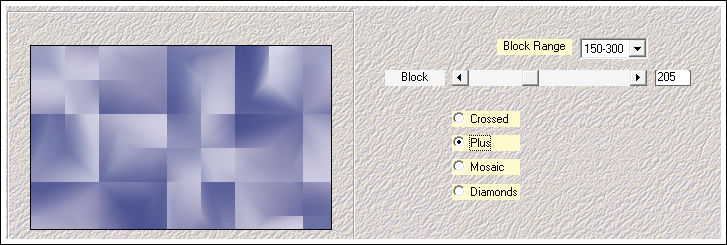
Effects / Plugins / Medhi / Wavy Lab 1.1
Nota: As cores dos quadrados coloridos são: #454d8c / #afabc8 / #e4e4f0 / #7b7caa
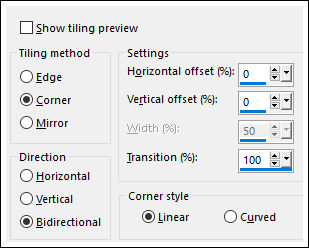
Effects / Image Effects / Seamless Tiling
Adjust / Blur / Gaussian Blur / Radius 40
3 - Layers / Duplicate
Effects / Plugins / Medhi / Sorting Tiles
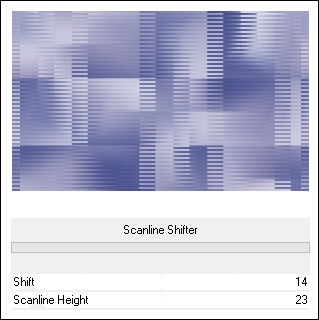
4 - Effects / Plugins / Unlimited 2 / Distortion Filters / Scanline Shifter
Effects / Image Effects / Seamless Tiling
Adjust / Sharpness / sharpen
5 - Layers / Duplicate
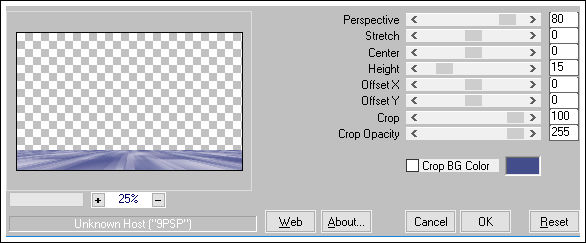
Effects / Plugins / Mura's Meister / Perspective Tiling
Effects / 3D Effects / Drop Shadow: -10/8/50/25/cor #000000
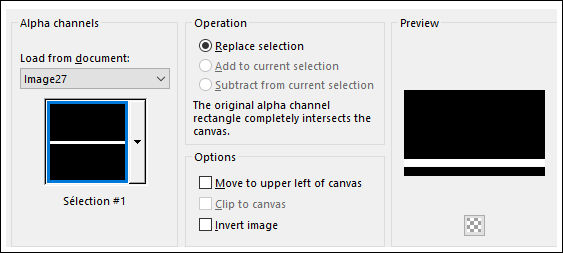
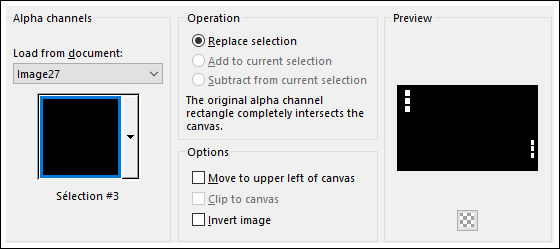
6 - Selections / Load Save Selections / Load selection from Alpha Channel: Selecion #1
Selections / Modify / Feather / Feather Amount: 25
Delete no teclado
Selections / Select None
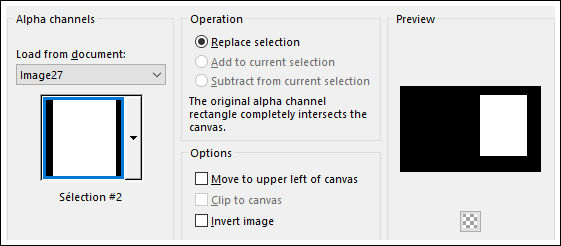
7 - Selections / Load Save Selections / Load selection from Alpha Channel: Selecion #2
Ative a Layer << Raster 1>>
Selections / Promote Selection / To Layer
Layers / Arrange / Bring to Top
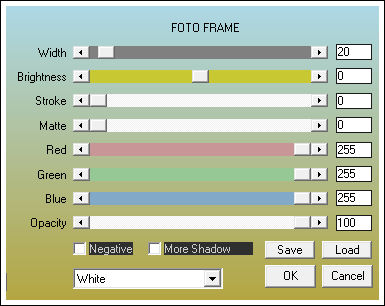
8 - Effects / Plugins /AAA Frame / Foto Frame
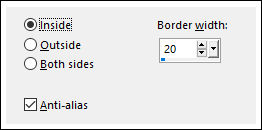
Selections / Modify / Select selection Borders
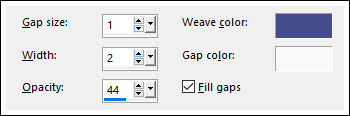
Effects / Texture Effects / Weaver
Selections / Select None
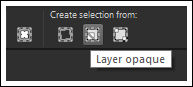
9 - Ative a Ferramenta Selection Tool (S) e clique e <<Layer Opaque>>
Selections / Modify / Contract / 20 pixels
Ative o tube << Vyp_Agathe01.pspimage >>
Copie e Cole Como Nova LayerPosicione como segue:
Selections / Invert
Delete no teclado
Selections / Select None
Layers / Merge / Merge Down
10 - Ative a Ferramenta Selection Tool (S) e clique e <<Layer Opaque>>
Selections / Modify / Contract 20 pixels
Effects / 3D Effects / Drop Shadow: 0/0/80/15/cor #34396c
Selections / Select NoneEffects / 3D Effects / Drop Shadow: 0/0/80/15/cor #34396c
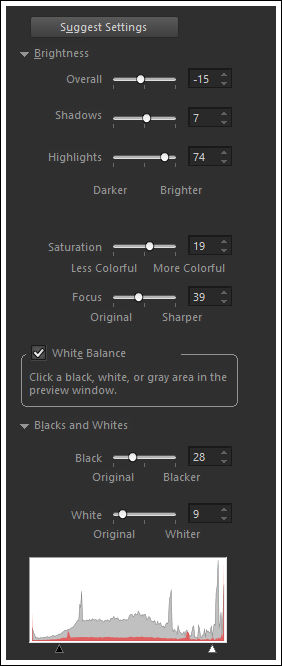
Adjust / Smart Photo Fix
11 - Layers / New Raster Layer
Selections / Load Save Selections / Load selection from Alpha Channel: Selecion #3
Preencha com a cor #ffffff
Selections / Modify / Contract 3 pixelsDelete no teclado
Ative a Layer << Raster 1>>
Selections / Promote Selection to Layer
Layers / Arrange / Bring to top
Effects / Plugins / Alien Skin Eye Candy 5 /Glass / preset Vyp_Agathe_glass.fL1
Selections / Select NoneLayers / Merge / Merge Down
12 - Layers / Duplicate
Layers / Arrange / Move Down
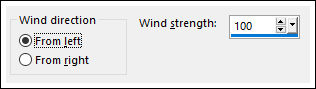
Effects / Distortion Effects / Wind
Effects / Edge Effects / Enhance More
Ative a Layer do topo
Effects / Plugins / Alien Skin Eye Candy 5 / Perspective Shadow / preset Vyp_Agathe_shadow.fL1
13 - Ative a Segunda Layer à Partir da Layer do Fundo <<Copy of Raster 1>>
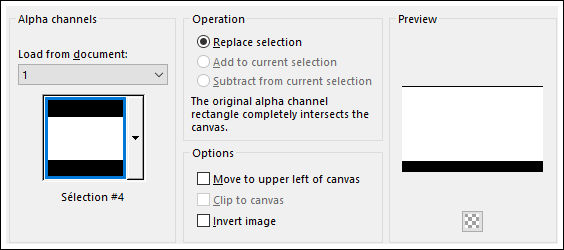
Selections / Load Save Selections / Load selection from Alpha Channel: Selecion #4
Selections / Promote Selection to Layer
Selections / Select None
Effects / Image Effects / Page Curl : Cores #3f4c9b /#5f63a0
14 - Layers / New Raster Layer
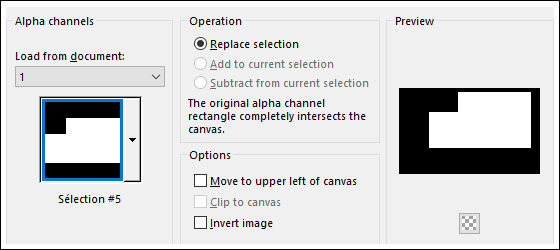
Selections / Load Save Selections / Load selection from Alpha Channel: Selecion #5
Preencha com a cor #ffffff
Selections / Modify / Contract 3 pixels
Delete no tecladoOpacidade do Baldinho de Pintura 60%
Preencha a seleçãoOpacidade do Baldinho de Pintura 100%
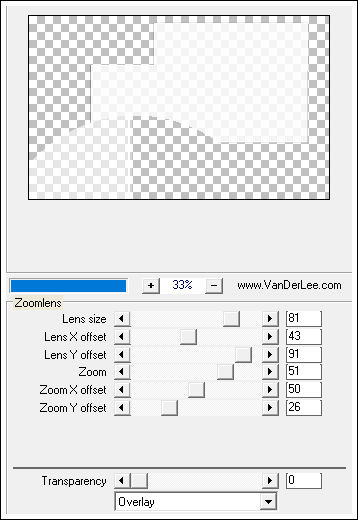
Selections / Select None15 - Effects / Plugins / Vanderlee / Unplugged X / Zoomlens
Effects / Image Effects / Seamless Tiling / Default
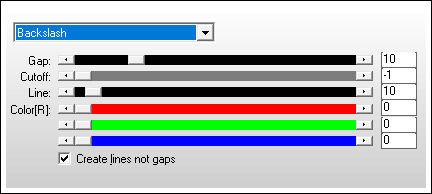
Effects / Plugins / AP Lines / Lines - Silverlining /Backslash
Blend Mode / Soft Light
16 - Selections / Load Save Selections / Load selection from Alpha Channel: Selecion #4
Selections / Invert
Delete no teclado
Selections / Select None
Effects / 3D Effects / Drop Shadow: 0/0/100/25/cor #383c7a
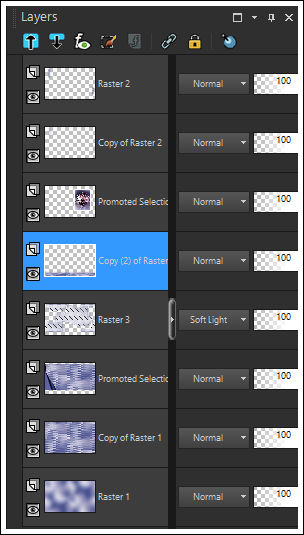
17 - Ative a Layer <<Copy 2 of Raster 1>>
Ative o tube <<déco Vyp_Agathe_deco01.pspimage>>
Copie e Cole como nova layer
Objects / Align / Top
Blend Mode / Hard Light
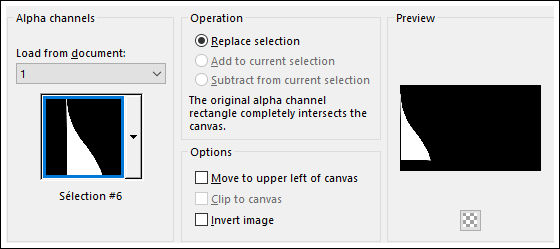
18 - Selections / Load Save Selections / Load selection from Alpha Channel: Selecion #6
Delete no teclado
Selections / Select None
19 - Ative a Layer do topo
Ative o tube <<déco Vyp_BonneAnne_deco02.pspimage>>
Copie e Cole Como Nova LayerObjects / Aligne / Top
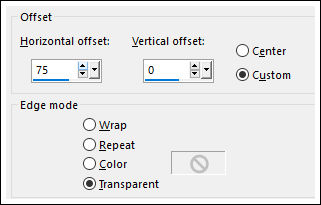
Effects / Image Effects / Offset: Hor.= 75/Vert.= 0 / Custom e Transparente , marcados
20 - Ative o tube <<woman_130_franiemargot.pspimage>>
Copie e Cole Como Nova layerImage / Resize / 70% ... Resize All Layers ...Desmarcado ( 2 vezes)
Image / Resize / 73% ... Resize All Layers ...Desmarcado
Ferramenta <<Pick Tool >> Position de X e de Y como abaixo:
Clique em "A" para sair da ferramenta
Layers / Duplicate
Ative a Layer <<Raster 6>>
Blend Mode / Multiply
21 - Ative o tube <<Vyp_Agathe_text01.pspimage>>
Copie e Cole como nova layerPosicione como na imagem final
22 - Ative o tube << Vyp_Agathe_text02.pspimage>>
Copie e Cole como nova layer
Posicione como na imagem final
23 - Image / Add Borders / Symmetric Marcado / 1 pixel cor #454d8c
Image / Add Borders / Symmetric Marcado / 15 pixels cor #ffffff
Image / Add Borders / Symmetric Marcado / 1 pixel cor #454d8c
Image / Add Borders / Symmetric Marcado / 3 pixels cor #ffffff
Image / Add Borders / Symmetric Marcado / 1 pixel cor #454d8c24 - Selections / Select All
Image / Add Borders / Symmetric Marcado / 45 pixels cor #ffffff
Effects / 3D Effects / Drop Shadow: 0/0/60/25/cor #000000
Selections / Select None25 - Image / Add Borders / Symmetric Marcado / 1 pixel cor #454d8c
Image / Add Borders / Symmetric Marcado / 3 pixels cor #ffffff
Image / Add Borders / Symmetric Marcado / 1 pixel cor #454d8c26 - Coloque a sua Assinatura
Layers / Merge / Merge All (Flatten)
Salve Como JPG
Versão com tube de @nn:
©Tutorial traduzido por Estela Fonseca em 07/01/2018.
Não alterar nem repassar sem autorização.