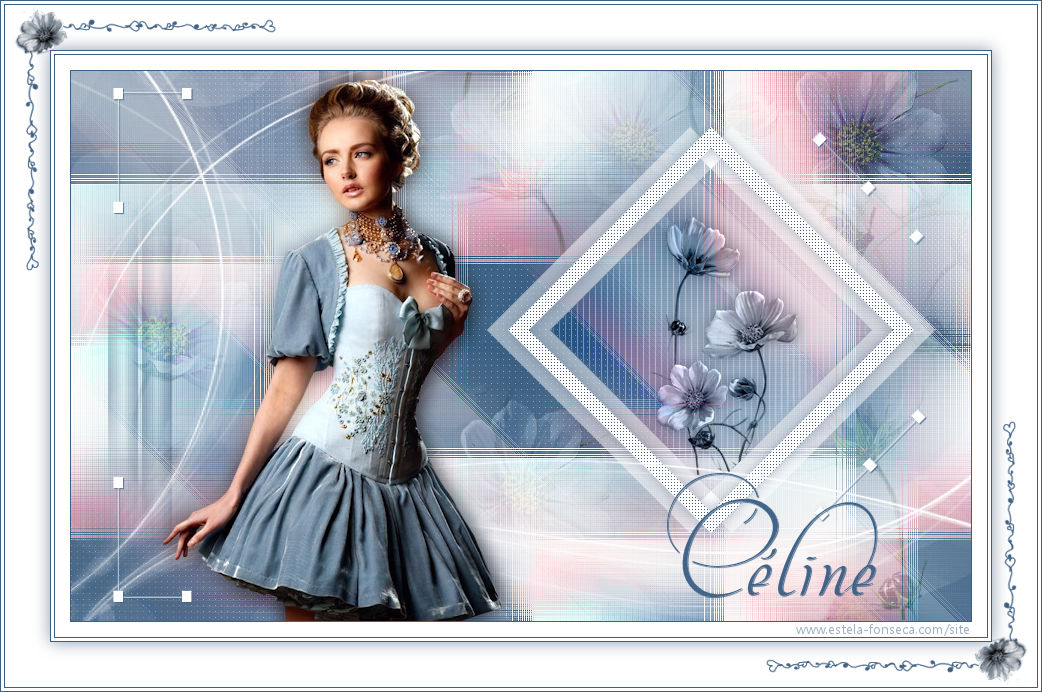
CÉLINE
Tutorial de Violette Graphic , original, Aqui.

Tutorial Traduzido no PSP X9
Materiais Necessários:
Tube de cickadesign-pi-397.png
Mask de Narah_mask_0781.jpg
Demais materiais de @Violette
Plugins Utilizados:
Medhi/Waby Labs /Sorting Tiles
Unlimited/Funhouse/Loom
AP Lignes/ Silverlining /Dotty Grid
Italian Editors Effects/Effeto Fanstasma
&< BKG Designers sf10 I >Cruncher
Preparação:Abra os tubes no PSP, duplique e feche os originais.
Abra a Mask no PSP e Minimize
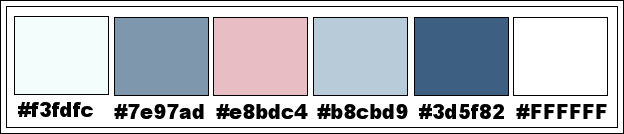
Tabela de Cores:
1 - Primeiro Plano cor #f3fdfc e Segundo Plano cor #7e97ad
Abra o arquivo << Vyp_Alpha_Celine>>
Window / Duplicate
Feche o original
2- Effects / Plugins / Medhi / Wavy Lab 1.1 :
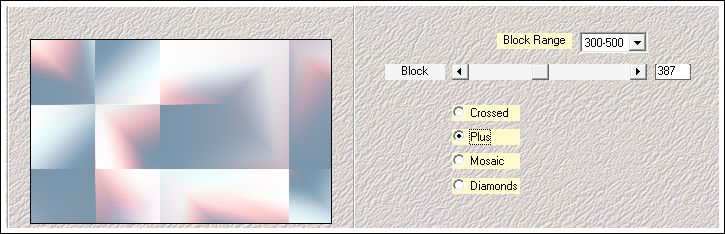
3 - Effects / Plugins / Medhi / Sorting Tiles:
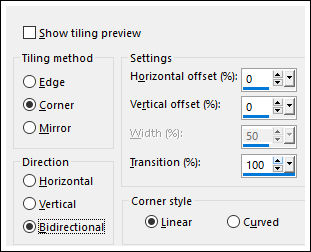
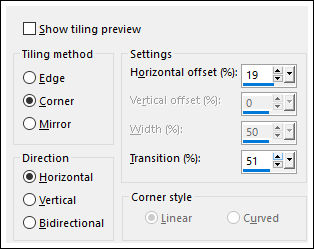
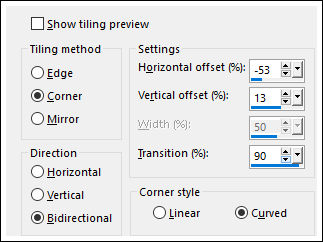
Effects / Image Effects / Seamless Tiling:
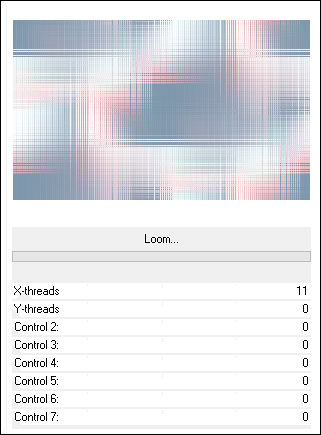
4 - Effects / Plugins / <I.C.NET Software> Filters Unlimited 2 / Funhouse / Loom:
Adjust / Sharpness / Sharpen
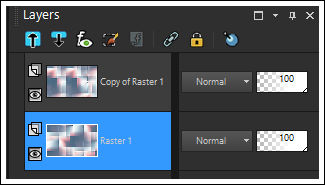
5 - Layers / Duplicate
Blend Mode / Multiply
Opacidade / 75%
Layers / Merge / Merge Down6 - Layers / Duplicate
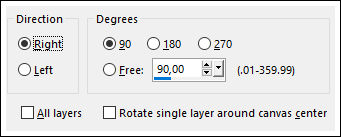
Image / Free Rotate / 90° Right
Effects / Image Effects / Seamless Tiling
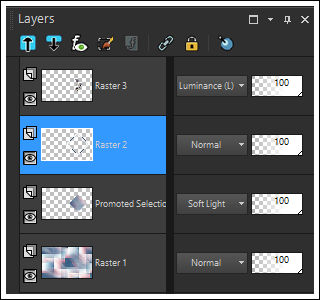
Ative a Layer <<Raster 1>>
Selections / Select All
Ative a Layer << Copy of Raster 1>>
Image / Crop to Selection
Image / Mirror / Mirror Vertical
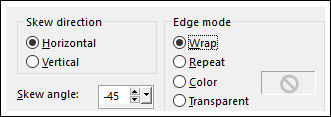
Effects / Geometric Effects / Skew
Blend Mode / Soft Light
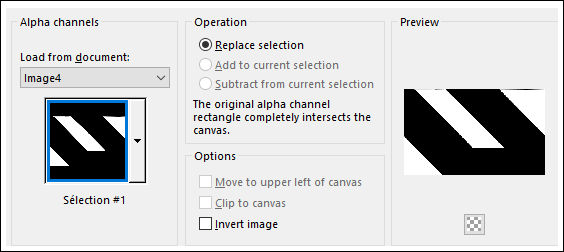
7 - Selections / Load-save Selection / Load selection from Alpha Channel: Selection #1
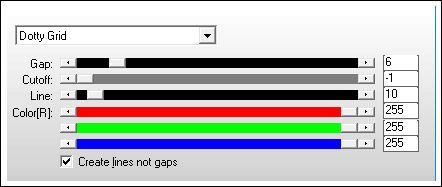
Effects / Plugins / AP Lines / Lines -Silverlining /Dotty Grid:
Selections / Select None
Layers / Merge / Merge Down
Layers / New Raster Layer
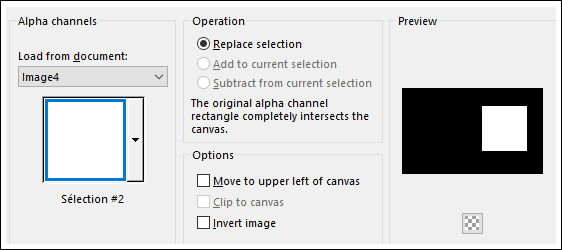
Selections / Load-save Selection / Load selection from Alpha Channel: Selection #2
Preencha a seleção com a cor #ffffff
8 - Selections / Modify / Contract 15 pixels
Delete no teclado
Selections / Select None
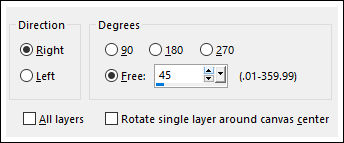
Image / Free Rotate / Right / 45°
Ferramenta Pick Tool (K) Posição de X= 437 e Posição de Y= 56, como na imagem abaixo:
Tecla "A" para sair da ferramenta
9 - Layers / Duplicate
Ative a Layer do meio <<Raster 2>>
Effects / Plugins / Italian Editors Effects / Effeto Fanstasma:
10 - Ative a Layer do topo
Effects / Edge Effects / Enhance
Effects / Texture Effects / Weave / #ffffff e #3c526d
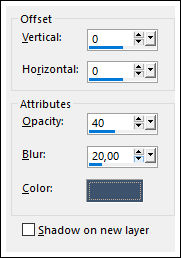
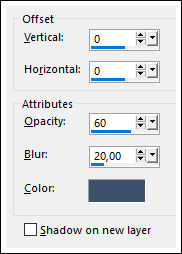
Effects / 3D Effects / Drop Shadow: 0/0/40/20/cor #3c526d
Layers / Merge / Merge Down
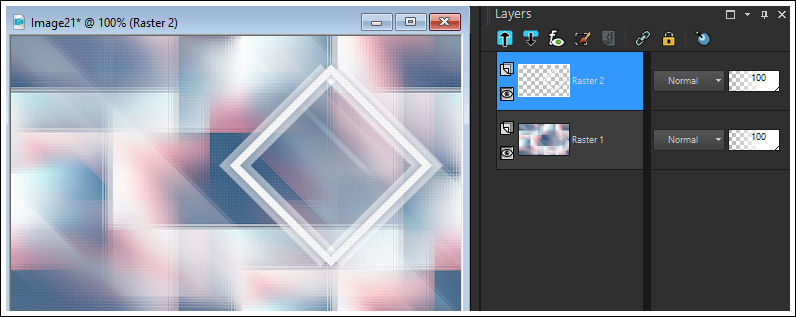
11 - Ative a Varinha Mágica e Selecione o interior do Losango
Ative a Layer do Fundo <<raster 1>>
Selections / Promote Selection to Layer
Adjust / Blur / Gaussian Blur / Radius 5
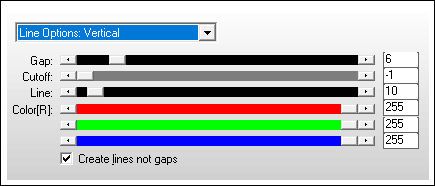
Effects / Plugins / AP Lines / Lines - Silverlining /Line Options Vertical:
Blend Mode / Soft Light
Selections / Select None
12 - Ative a Layer do topo
Ative o tube << Vyp_celine_fleurs01.pspimage>>
Copie e Cole como nova layer
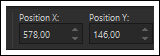
Ferramenta Pick Tool (K) Posição de X= 578 e Posição de Y= 146, como na imagem abaixo:
Tecla "A" para sair da ferramenta
Ative a Layer <<raster 2>>
Selecione dentro do Quadro
Selections / Invert
Ative a Layer <<Raster 3>>
Delete no teclado
Blend Mode / Luminance (Legacy)
Selections / Select None
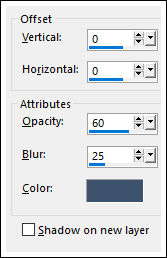
Effects / 3D Effects / Drop Shadow: 0/0/60/20/cor #3c526d
13 - Layers / New Raster Layer
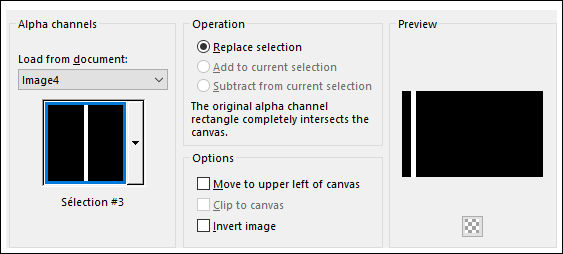
Selections / Load-save Selection / Load selection from Alpha Channel: Selection #3
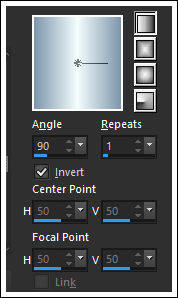
Primeiro Plano cor #f3fdfc / Segundo Plano#7e97ad
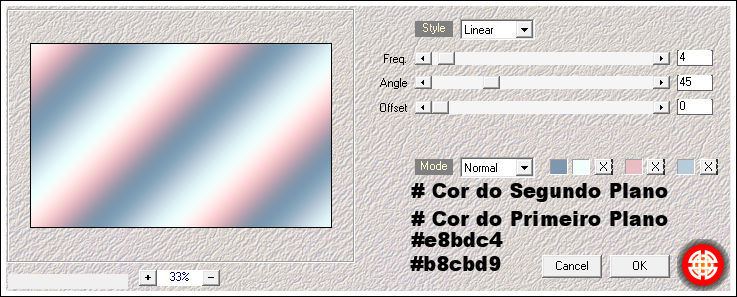
Gradiente estilo <<Linear>> Angle 90 / Repeats 1
Preencha a seleção com o Gradiente
Selections / Select None
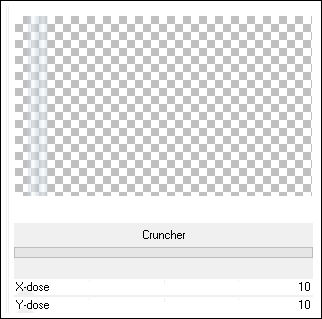
14 - Effects / Plugins / <I.C.NET Software> Filters Unlimited 2. 0 / &< BKG Designers sf10 I >Cruncher:
Blend Mode / Multiply
Layers / Duplicate
Layers / Merge / Merge Down
Effects / Image Effects / Seamless Tiling
15 - Ative a Layer <<Raster 1>>
Abra o tube <<déco Vyp_celine_deco01.pspimage>>
Copie e Cole como nova layer
Blend Mode / Soft Light
16 - Ative a Layer do topo
Layers / New Raster Layer
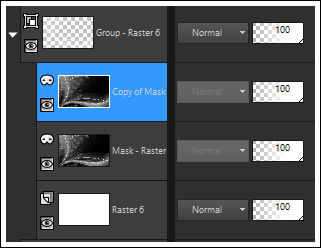
Preencha com a cor #ffffff
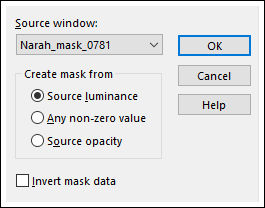
Ative a Mask <<Narah_mask_0781.jpg>> Minimize
Layers / New Mask layer / From Image: Narah_mask_0781.jpg
Layers / Duplicate
Layers / Merge / Merge Group
17 - Ative o tube <<déco Vyp_celine_deco02.pspimage>>
Copie e Cole como nova layer
18 - Ative o tube <<cickadesign-pi-397.png>>
Apague a marca d'água
Copie e Cole como nova layer
Image /Mirror / Mirror horizontal
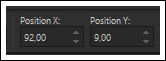
Image / Resize / 75%... Resize all Layers ... DesmarcadoAtive a Ferramenta <<pick Tool>> Posição de X= 92 e de Y= 9 ...conforme imagem abaixo
Tecla "A" para sair da ferramenta
19 - Layers / Duplicate
Ative a layer << Raster 7>>
Adjust / Blur / Gaussian Blur / Radius 10
Blend Mode / Multiply
Opacidade / 77
20 - Ative o tube <<Vyp_Celine_text01.pspimage>>
Copie e Cole como nova layer
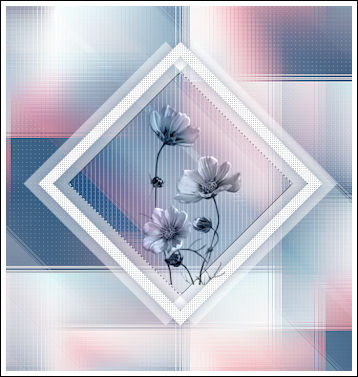
Posicione como na imagem final
21 - Image /Add Borders / Symmetric Marcado / 1 pixel cor #3d5f82
Image /Add Borders / Symmetric Marcado / 15 pixels cor #ffffff
Image /Add Borders / Symmetric Marcado / 1 pixel cor #3d5f82
Image /Add Borders / Symmetric Marcado / 3 pixels cor #ffffff
Image /Add Borders / Symmetric Marcado / 1 pixel cor #3d5f8224 - Selections / Select All
Image /Add Borders / Symmetric Marcado / 45 pixels cor #ffffff
Effects/ 3D Effects / Drop Shadow: 0/0/60/25/cor #3d5f82
Selections / Select None25 - Image /Add Borders / Symmetric Marcado / 1 pixel cor #3d5f82
Image /Add Borders / Symmetric Marcado / 3 pixels cor #ffffff
Image /Add Borders / Symmetric Marcado / 1 pixel cor #3d5f8226 - Ative o tube <<déco Vyp_celine_deco03.pspimage>>
Copie e Cole como nova layer27 - Coloque a sua assinatura
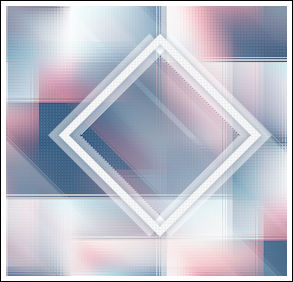
28 - Layers / Merge / Merge All
29 - Exporte como JPG
Versão com tube de Thaf's (Flores) e de Maryse (Personagem):
©Tutorial traduzido por Estela Fonseca em 19/02/2018.
Não alterar nem repassar sem autorização.