BLEND PASCUA
Tutorial de ©Alicia.Original Aqui.
Criado na versão X3 mas pode ser realizado em versões anteriores.
Materiais Necessários:
Tube easter_068_pattyf056
https://blog.libero.it:80/pattyf56mists/
Tube K@rine_dreams_Little_Bunny_984_MARZ 2010
https://groups.google.fr/group/exclusifs-tubes-karine-dreams?hl=fr
tube jet-bunny-lover-by-widjita-februari-2009
https://www.pspjet.nl/index.html
Marca d'água tutorialespspaliciar
Plugins Utilizados:Plugin XE Xtras/Elemental/Fire
Plugin Greg's Factory Output vol ll/Pool Shadow
Começando:
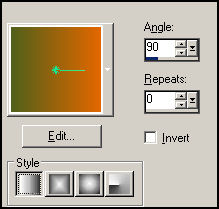
1. Abra uma nova imagem transparente de 800 x 500 Pixels.Preencha com o gradiente estilo Linear formado pelas cores #50601b e #e36700.
Configuração: Angle 90/Repeats 0
2. Nova layer.Selections / Select All.
Copie o tube <<easter_068_pattyf056 (Layer mist_1)>>
Cole na seleção.
Blend Mode / Hard Light.
Selections/Select None
3. Copie o tube << K@rine_dreams_Little_Bunny_984_MARZ 2010>>
Cole como nova layer
Baixe a opacidade para 60%
4. Layers/Merge/Merge Visible
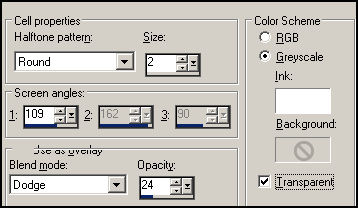
5. Effects/Artistic Effects/Halftone
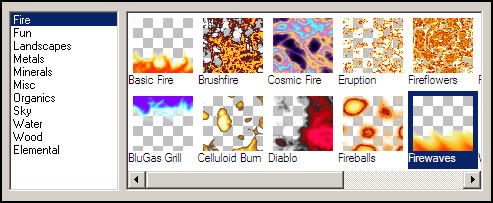
6. Effects /Plugin XE Xtras/Elemental/Fire
7. Edit/Copy
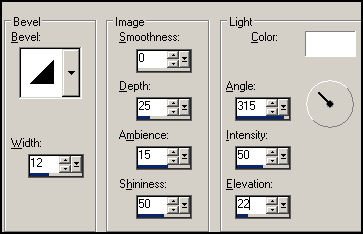
8. Selections/Select All Effects/3D Effects/Inner Bevel
Selections/Select None
9. Image/Add Borders/Symmetric/30 Px. cor #ff9d45 .Ative a varinha mágica e selecione
Edit/Paste into Selection.
10. Effects / Plugin Greg´s Factory Output vol ll/Pool Shadow DefaultSelections/Select None.
11. Image/Add Borders/Symmetric/4 Px. Cor #edd92d
12. Copie e cole como nova layer o tube <<jet-bunny-lover-by-widjita-februari-2009>>
Redimensione em 70%. ( arraste para o canto direito, veja exemplo)
13. Effects/3D Effects/Drop Shadow: -15/ -8/ 45 / 40,00 / Cor #00000014. Image/Add Borders/Symmetric/40 PX. Cor #d64909
15. Assine, coloque a marca d'água tutorialespspaliciar, Merge all. Exporte como jpeg.
©Tutorial de Alicia, traduzido por Estela Fonseca em: 16/03/2012.
Não alterar nem repassar sem autorização.